Getting Started with NVIDIA Jetson Orin Super
First Look at NVIDIA Jetson Orin Nano Super - The Most Affordable Generative AI Supercomputer

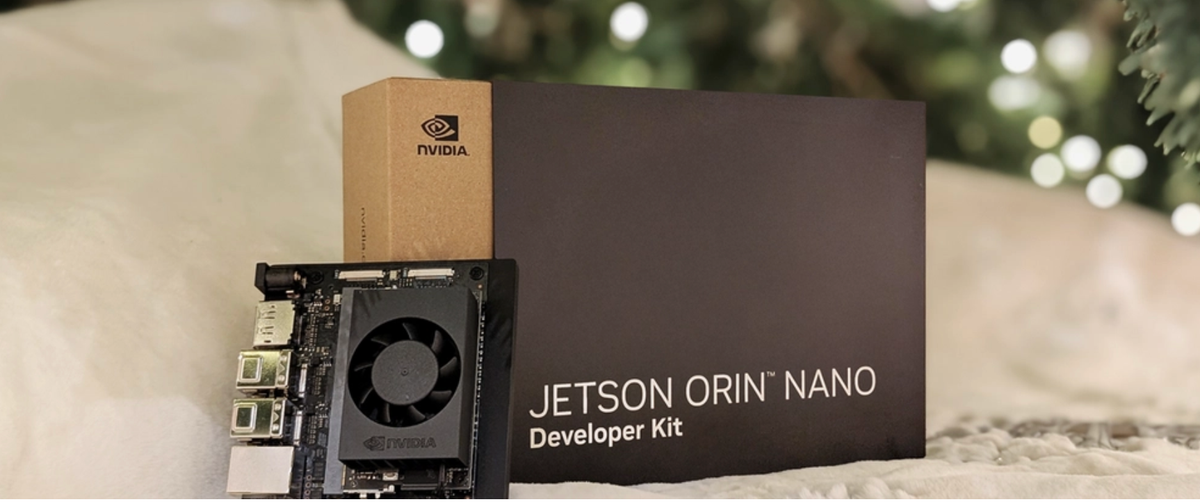
NVIDIA has just reinvented edge computing with its latest offering - the Jetson Orin Nano Super Developer Kit. This isn't just an incremental update; it's a significant leap forward in bringing generative AI capabilities to the edge at an unprecedented price point of $249.
Comparing Jetson Nano Vs Jetson Orin Nano Super
The NVIDIA Jetson Orin Nano Super Developer Kit is a compact, yet powerful computer that redefines generative AI for small edge devices.
It delivers up to 67 TOPS of AI performance—a 1.7X improvement over its predecessor—to seamlessly run a wide variety of generative AI models, like vision transformers, large language models, vision-language models, and more.
It provides developers, students, and makers with the most affordable and accessible platform with the support of the NVIDIA AI software and a broad AI software ecosystem to democratize generative AI at the edge. Existing Jetson Orin Nano Developer Kit users can experience this performance boost with just a software upgrade, so everyone can
now unlock new possibilities with generative AI.
Learn about Jetson AI Lab
Let's dive into the specs and see how it compares to its predecessors:
| Feature | Orin Nano Original | Orin Nano Super | Improvement |
|---|---|---|---|
| GPU Architecture | NVIDIA Ampere (1024 CUDA cores, 32 Tensor cores) @ 635 MHz | NVIDIA Ampere (1024 CUDA cores, 32 Tensor cores) @ 1020 MHz | 1.6x GPU Clock |
| AI Performance | 40 TOPS (Sparse) / 20 TOPS (Dense) | 67 TOPS (Sparse) / 33 TOPS (Dense) | 1.7x AI Performance |
| CPU | 6-core Arm Cortex-A78AE @ 1.5 GHz | 6-core Arm Cortex-A78AE @ 1.7 GHz | 1.13x CPU Clock |
| Memory | 8GB 128-bit LPDDR5 @ 68 GB/s | 8GB 128-bit LPDDR5 @ 102 GB/s | 1.5x Memory Bandwidth |
| Module Power | 7W/15W | 7W/15W/25W | Additional Power Mode |
How powerful is NVIDIA Jetson Orin Super?
The most striking aspect of the Super variant is its performance improvements:
- 1.7x increase in AI compute performance (67 TOPS vs 40 TOPS)
- 1.5x increase in memory bandwidth (102 GB/s vs 68 GB/s)
- Higher GPU and CPU clock speeds for better overall performance
Generative AI Capabilities
The NVIDIA Jetson™ platform runs the NVIDIA AI software stack, with a variety of available use-case-specific application frameworks. These include NVIDIA Isaac™ for robotics, NVIDIA Metropolis for vision AI, and NVIDIA Holoscan for sensor processing. You can save significant time with NVIDIA Omniverse™ Replicator for synthetic data generation (SDG) and NVIDIA TAO Toolkit for fine-tuning pretrained AI models from the NVIDIA® NGC™ catalog.
One of the most impressive aspects of the Orin Nano Super is its ability to run various types of generative AI models:
Large Language Models (LLMs):
| Model | Performance Gain |
|---|---|
| Llama-3.1 8B | 1.37x |
| Llama 3.2 3B | 1.55x |
| Qwen2.5 7B | 1.53x |
| Gemma2 2B | 1.63x |
| Gemma2 9B | 1.28x |
| Phi 3.5 3B | 1.54x |
| SmoLLM2 1.7B | 1.57x |
Vision Language Models (VLMs):
| Model | Performance Gain |
|---|---|
| VILA 1.5 3B | 1.51x |
| VILA 1.5 8B | 1.45x |
| LLAVA 1.6 7B | 1.36x |
| Qwen2-VL-2B | 1.57x |
| InternVL2.5-4B | 2.04x |
| PaliGemma2-3B | 1.58x |
| SmoLVLM-2B | 1.59x |
Vision Transformers
| Model | Performance Gain |
|---|---|
| clip-vit-base-patch32 | 1.60x |
| clip-vit-base-patch16 | 1.69x |
| DINOv2-base-patch14 | 1.68x |
| SAM2 base | 1.43x |
| Grounding-DINO | 1.52x |
| vit-base-patch16-224 | 1.61x |
| vit-base-patch32-224 | 1.60x |
I/O and Connectivity
| Interface | Specification |
|---|---|
| Camera | 2x MIPI CSI-2 22-pin Camera Connectors |
| PCIe | M.2 Key M x4 PCIe Gen 3 |
| Additional PCIe | M.2 Key M x2 PCIe Gen3 |
| Expansion | M.2 Key E PCIe (x1), USB 2.0, UART, I2S, and I2C |
| USB | 4x USB 3.2 Gen2 Type A + 1x Type C for Debug |
| Network | 1x GbE Connector |
| Display | DisplayPort 1.2 (+MST) |
| Storage | microSD slot (UHS-1 cards up to SDR104 mode) |
| GPIO | 40-Pin Expansion Header |
Developer-Friendly Features
| Feature | Description |
|---|---|
| Software Stack | Full support for TensorRT-LLM |
| Framework Compatibility | Native compatibility with popular frameworks |
| Jetson Ecosystem | Jetson Software Stack & Microservices support |
| Deployment | Pre-built containers for rapid deployment |
AI Development Tools
| Tool | Description |
|---|---|
| TensorRT Optimization | Optimized inference using TensorRT |
| Quantization Support | INT8/FP16 quantization support |
| Multi-Model Inference | Ability to run multiple models simultaneously |
| Containerization | Docker container support for easy deployment |
Getting Started with Jetson Orin Super
This guide will walk you through setting up Ollama on your Jetson device, integrating it with Open WebUI, and configuring the system for optimal GPU utilization. Whether you're a developer or an AI enthusiast, this setup allows you to harness the full potential of LLMs right on your Jetson device.
Pre-requisite
What do you need?
- Jetson Orin Nano
- A DC power supply (DC to HDMI port)
Note: The NVIDIA Jetson Orin Nano Developer Kit doesn't support
HDMI, but it does have a DisplayPort output port. You can use an
adapter to connect the kit to a monitor or TV that only has HDMI.
- NVMe SSD (instead of SD card)
Note: I highly recommend using NVMe SSD if you're serious about running
AI workload. Add NVMe SSD to the Jetson Board
- WiFi Adapter
- Wireless Keyboard
- Wireless mouse
- A Linux Laptop to install SDK Manager
Note: NVIDIA SDK Manager is required to flash Jetson Orin SDK card image to the board. Don't waste your time just writing it down to SD card directly. Save your time with SDK Manager.
Software
- Download Jetson SD card image
Ensure that you download the latest JetPack 6.2 SDK from this link. Your Jetson Orin Nano Developer Kit comes with an old firmware flashed at the factory, which is NOT compatible with JetPack 6.x. Click here to download
- Etcher installed on your local system
Download Jetson SDK using this link
Getting Started
- Flashing the Jetson Board using SDK Manager - The Correct Way
To flash the Orin Nano using the SDK Manager, it must first be put > into “recovery mode.” To do that, attach a jumper or jumper wire between the FC_REC and GND pins (pins 2 and 3) on the underside of the Orin Nano card. Refer this blog to know more
- Ensure that SDK Manager detects the Jetson Board as well as NVMe SSD
- Flash the NVMe SSD with the operating system
Step 1. Verify L4T Version
To check the L4T (Linux for Tegra) version on your NVIDIA Jetson device (e.g., Jetson Nano, Jetson Xavier), follow these steps:
Run the following command to retrieve your current L4T version.
head -n 1 /etc/nv_tegra_release
Results:
head -n 1 /etc/nv_tegra_release
# R36 (release), REVISION: 4.3, GCID: 38968081, BOARD: generic, EABI: aarch64, DATE: Wed Jan  8 01:49:37 UTC 2025
Here are the list of supported L4T versions:
- 35.3.1
- 35.4.1
- 35.5.0
- 36.3.0
If your L4T version does not match the supported versions listed above, you may need to re-flash the system on your NVIDIA Jetson device. You might need to use SDK Manager on another computer to re-flash the device. You can download the SDK Manager and follow the tutorial from the official NVIDIA Developer site.
Step 2. Keep apt up to date:
sudo apt update && sudo apt upgrade
Step 3. Install jetpack:
sudo apt install jetpack
Step 4. Add users
Add your user to the docker group and restart the Docker service to apply the change:
   sudo usermod -aG docker $USER && \
   newgrp docker && \
   sudo systemctl daemon-reload && \
   sudo systemctl restart docker
Step 5. Install jetson-examples:
pip3 install jetson-examples
Step 6. Reboot system
sudo reboot
Step 7. Install Ollama
reComputer run ollama
Optional: If you run the above command via ssh and encounter the error command not found: reComputer, you can resolve this by executing the following command:
source ~/.profile
Step 8. Run a model
I was able to run DeepSeek R1 model and the overall result was quite impressive.
Step 9. Install models (e.g. llama3.2) from Ollama Library
ollama pull llama3.2
Step 9. Install and run Open WebUI through Docker
Jetson Orin comes with Docker installed by default. As of writing, I had the following Docker binaries installed by default:
ajeetraina@ajeetraina-desktop:~$ sudo docker version
[sudo] password for ajeetraina:
Client: Docker Engine - Community
 Version:           28.0.1
 API version:       1.48
 Go version:        go1.23.6
 Git commit:        068a01e
 Built:             Wed Feb 26 10:41:16 2025
 OS/Arch:           linux/arm64
 Context:           default

Server: Docker Engine - Community
 Engine:
  Version:          28.0.1
  API version:      1.48 (minimum version 1.24)
  Go version:       go1.23.6
  Git commit:       bbd0a17
  Built:            Wed Feb 26 10:41:16 2025
  OS/Arch:          linux/arm64
  Experimental:     false
 containerd:
  Version:          1.7.25
  GitCommit:        bcc810d6b9066471b0b6fa75f557a15a1cbf31bb
 runc:
  Version:          1.2.4
  GitCommit:        v1.2.4-0-g6c52b3f
 docker-init:
  Version:          0.19.0
  GitCommit:        de40ad0
docker run -d -p 3000:8080 --gpus all --add-host=host.docker.internal:host-gateway -v open-webui:/app/backend/data --name open-webui --restart always ghcr.io/open-webui/open-webui:cuda
Step 10. Install and run Open WebUI through docker
Once the installation is finished, you can access the GUI by visiting YOUR_SERVER_IP:3000 in your browser.
Access the API endpoints by navigating to YOUR_SERVER_IP/ollama/docs#/. For comprehensive documentation, please refer to the official resources: the Ollama API Documentation (recommended) and Open WebUI API Endpoints.
Using GPU
This installation method uses a single container image that bundles Open WebUI with Ollama, allowing for a streamlined setup via a single command. Choose the appropriate command based on your hardware setup:
sudo docker run -d -p 3000:8080 --gpus=all -v ollama:/root/.ollama -v open-webui:/app/backend/data --name open-webui --restart always ghcr.io/open-webui/open-webui:ollama
Using CPU only
For CPU Only: If you're not using a GPU, use this command instead:
sudo docker run -d -p 3000:8080 -v ollama:/root/.ollama -v open-webui:/app/backend/data --name open-webui --restart always ghcr.io/open-webui/open-webui:ollama
Both commands facilitate a built-in, hassle-free installation of both Open WebUI and Ollama, ensuring that you can get everything up and running swiftly.
Once configured, Open WebUI can be accessed at http://localhost:3000, while Ollama operates at http://localhost:11434. This setup provides a seamless and GPU-accelerated environment for running and managing LLMs locally on NVIDIA Jetson devices.
Setting up TensorRT LLM
TensorRT-LLM is essentially a specialized tool that makes large language models (like ChatGPT) run much faster on NVIDIA hardware.
Think of it this way: If a regular language model is like a car engine that can get you from point A to point B, TensorRT-LLM is like a high-performance tuning kit that makes that same engine much more efficient and powerful.
In simple terms:
- It takes AI language models that would normally be slow to respond and optimizes them to run much faster.
- It's specifically designed for NVIDIA hardware like your Jetson Orin, helping it punch above its weight when running complex AI models.
- It works by restructuring the model to eliminate inefficiencies, similar to how a mechanic might tune a car engine to get better performance without changing the basic design.
- The end result is that AI models that might be too slow to be practical on your device can now run with reasonable response times.
TensorRT-LLM is a high-performance LLM inference library with advanced quantization, attention kernels, and paged KV caching. Initial support for building TensorRT-LLM from source for JetPack 6.1 has been included in the v0.12.0-jetson branch of the TensorRT-LLM repo for Jetson AGX Orin.
I recommend NVMe SSD highly recommended for storage speed and space
- 18.5GB for tensorrt_llm container image
- Space for models ( >10GB )
git clone https://github.com/dusty-nv/jetson-containers
bash jetson-containers/install.sh
Building TensorRT-LLM Engine for Llama
You can find the steps for converting Llama to TensorRT-LLM under examples/llama in the repo, and also in the documentation . This script will automate the process for Llama-7B with INT4 quantization applied, and run some generation and performance checks on the model:
First, get the Hugging Face API token , pass it to the command and run it:
First, create the directory with the proper permissions:
sudo mkdir -p /tmp/llama2-config
sudo chmod 777 /tmp/llama2-config
Then try creating the files again:
cat > /tmp/llama2-config/config.json << 'EOF'
{
  "_name_or_path": "meta-llama/Llama-2-7b-chat-hf",
  "architectures": ["LlamaForCausalLM"],
  "attn_implementation": "sdpa",
  "bos_token_id": 1,
  "eos_token_id": 2,
  "hidden_act": "silu",
  "hidden_size": 4096,
  "initializer_range": 0.02,
  "intermediate_size": 11008,
  "max_position_embeddings": 4096,
  "model_type": "llama",
  "num_attention_heads": 32,
  "num_hidden_layers": 32,
  "num_key_value_heads": 32,
  "pretraining_tp": 1,
  "rms_norm_eps": 1e-05,
  "rope_scaling": null,
  "tie_word_embeddings": false,
  "torch_dtype": "float16",
  "transformers_version": "4.31.0",
  "use_cache": true,
  "vocab_size": 32000
}
EOF
Also create the tokenizer config:
cat > /tmp/llama2-config/tokenizer_config.json << 'EOF'
{
  "add_bos_token": true,
  "add_eos_token": false,
  "bos_token": {
    "__type": "AddedToken",
    "content": "<s>",
    "lstrip": false,
    "normalized": true,
    "rstrip": false,
    "single_word": false
  },
  "clean_up_tokenization_spaces": false,
  "eos_token": {
    "__type": "AddedToken",
    "content": "</s>",
    "lstrip": false,
    "normalized": true,
    "rstrip": false,
    "single_word": false
  },
  "model_max_length": 1000000000000000019884624838656,
  "tokenizer_class": "LlamaTokenizer",
  "unk_token": {
    "__type": "AddedToken",
    "content": "<unk>",
    "lstrip": false,
    "normalized": true,
    "rstrip": false,
    "single_word": false
  }
}
EOF
It’s time to convert the model:
jetson-containers run \
  -e HUGGINGFACE_TOKEN=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 \
  -e FORCE_BUILD=on \
  -v /tmp/llama2-config:/tmp/llama2-config \
  dustynv/tensorrt_llm:0.12-r36.4.0 \
  bash -c "cd /opt/TensorRT-LLM/examples/llama && python3 convert_checkpoint.py \
  --model_dir /tmp/llama2-config \
  --output_dir /data/models/tensorrt_llm/Llama-2-7b-chat-hf-gptq \
  --dtype float16 \
  --quant_ckpt_path /data/models/huggingface/models--TheBloke--Llama-2-7B-Chat-GPTQ/snapshots/d5ad9310836dd91b6ac6133e2e47f47394386cea/model.safetensors \
  --use_weight_only \
  --weight_only_precision int4_gptq \
  --group_size 128 \
  --per_group"
Great! The conversion is running successfully now. You can see it's processed 550 iterations at a rate of 4.83 iterations per second, which is good progress.
The command is working correctly, and the model is being converted to the TensorRT-LLM format. This process will continue for a while as it works through all the model layers and weights to optimize them for your Jetson hardware.
To run the conversion process without entering the container, you'll need to create a single command that handles the complete workflow. I'll create a script that you can save and run:
#!/bin/bash

# Save this as convert_llama_gptq.sh and make it executable with: chmod +x convert_llama_gptq.sh

# Run the container with all the necessary steps in sequence
jetson-containers run \
  -it \
  dustynv/tensorrt_llm:0.12-r36.4.0 \
  bash -c '
    # Step 1: Install GPTQ model support
    pip install gptqmodel

    # Step 2: Download the complete model with configs
    cd /tmp
    python3 -c "from transformers import AutoModelForCausalLM; AutoModelForCausalLM.from_pretrained('\''TheBloke/Llama-2-7B-Chat-GPTQ'\'', trust_remote_code=True)"

    # Step 3: Find the snapshot directory
    SNAPSHOT_DIR=$(find /root/.cache/huggingface/hub/models--TheBloke--Llama-2-7B-Chat-GPTQ/snapshots -type d | head -1)
    echo "Using model directory: $SNAPSHOT_DIR"

    # Step 4: Run the conversion
    cd /opt/TensorRT-LLM/examples/llama
    python3 convert_checkpoint.py \
      --model_dir $SNAPSHOT_DIR \
      --output_dir /data/models/tensorrt_llm/Llama-2-7b-chat-hf-gptq \
      --dtype float16 \
      --use_weight_only \
      --weight_only_precision int4_gptq \
      --group_size 128 \
      --per_group
Save this script to a file, make it executable, and run it. The entire process will be executed within the container in sequence without you needing to enter the container manually.
The script:
- Installs the GPTQ model support
- Downloads the complete model with all configs
- Finds the actual snapshot directory where the model was downloaded
- Runs the conversion with the proper directory
Note that this will still take a significant amount of time to complete, especially the conversion step. You'll see the output in your terminal as the process runs.
#!/bin/bash

# Save this as convert_llama_gptq.sh and make it executable with: chmod +x convert_llama_gptq.sh

# Run the container with all the necessary steps in sequence
jetson-containers run \
  -it \
  dustynv/tensorrt_llm:0.12-r36.4.0 \
  bash -c '
    # Step 1: Install required packages
    pip install auto-gptq

    # Step 2: Create a config directory with required files
    mkdir -p /tmp/llama_config

    # Create config.json
    cat > /tmp/llama_config/config.json << EOF
{
  "_name_or_path": "meta-llama/Llama-2-7b-chat-hf",
  "architectures": ["LlamaForCausalLM"],
  "bos_token_id": 1,
  "eos_token_id": 2,
  "hidden_act": "silu",
  "hidden_size": 4096,
  "initializer_range": 0.02,
  "intermediate_size": 11008,
  "max_position_embeddings": 4096,
  "model_type": "llama",
  "num_attention_heads": 32,
  "num_hidden_layers": 32,
  "num_key_value_heads": 32,
  "rms_norm_eps": 1e-05,
  "rope_scaling": null,
  "tie_word_embeddings": false,
  "transformers_version": "4.31.0",
  "use_cache": true,
  "vocab_size": 32000
}
EOF

    # Step 3: Run the conversion
    cd /opt/TensorRT-LLM/examples/llama
    python3 convert_checkpoint.py \
      --model_dir /tmp/llama_config \
      --output_dir /data/models/tensorrt_llm/Llama-2-7b-chat-hf-gptq \
      --dtype float16 \
      --quant_ckpt_path /data/models/huggingface/models--TheBloke--Llama-2-7B-Chat-GPTQ/snapshots/d5ad9310836dd91b6ac6133e2e47f47394386cea/model.safetensors \
      --use_weight_only \
      --weight_only_precision int4_gptq \
      --group_size 128 \
      --per_group
Conclusion
The Jetson Orin Nano Super Developer Kit represents a significant milestone in edge AI computing. It brings datacenter-class AI capabilities to the edge at an unprecedented price point, making it an ideal platform for developers, researchers, and businesses looking to deploy advanced AI applications at the edge.
The combination of increased AI performance, enhanced memory bandwidth, and broad model support makes it a compelling choice for anyone serious about edge AI development. At $249, it's not just a product - it's a revolution in accessible AI computing.
In the next blog post, we will deep dive further into model optimisation. Stay tuned.
