How I Built My First MCP Server For Postgres and Connected it to Claude Desktop
What if an AI Assistant like Claude Desktop could query your database directly? I built a custom MCP server for Postgres that lets me ask Claude natural language questions about my data, and it responds with real-time insights by running SQL queries behind the scenes.

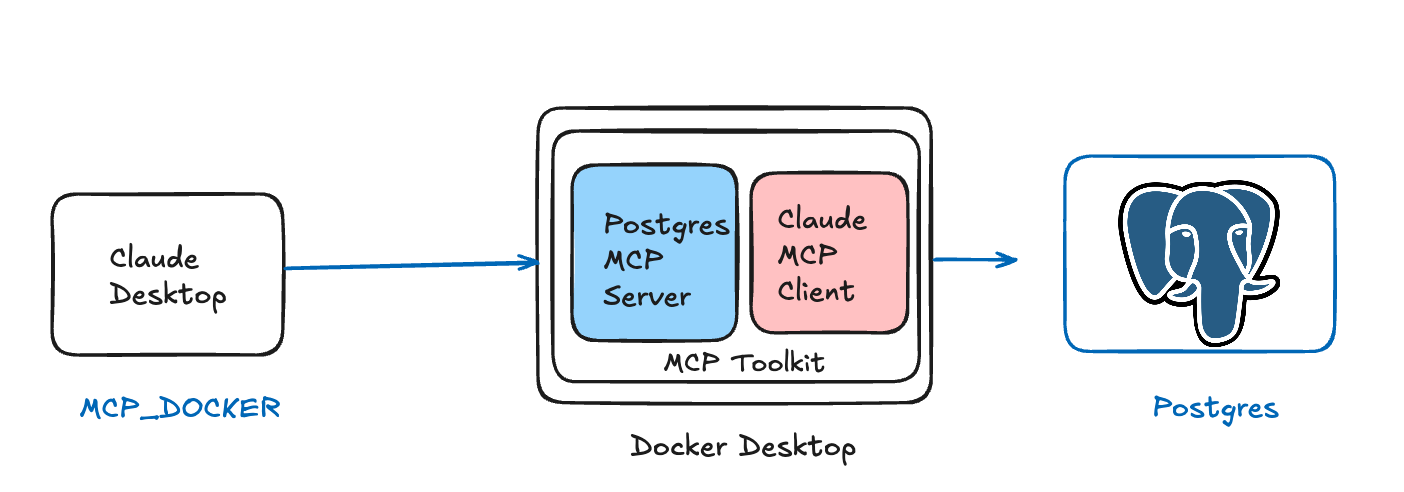
When I first heard about the Model Context Protocol (MCP), I was intrigued by the possibility of giving Claude direct access to my databases. As someone who works with Postgres regularly, I wanted to see if I could build a custom MCP server that would let Claude query my database directly through natural language. Here's how I did it using Docker Desktop's MCP Toolkit Extension with a real sample application, and what I learned along the way.
What is MCP and Why Does It Matter?
The Model Context Protocol (MCP) is an open standard that allows AI assistants like Claude to securely connect to various data sources and tools. Instead of copying and pasting database results or describing my data structure, I wanted Claude to be able to query my Postgres database directly, understand the schema, and provide insights based on real data.
Think of MCP as a bridge between Claude and your local tools - in this case, my containerized Postgres database.
What We'll Build
By the end of this tutorial, you'll have:
- A real e-commerce database with sample data (using catalog-service-node example)
- A containerized MCP server that connects to this database
- Claude Desktop configured to use your containerized MCP server via Docker Desktop's MCP Toolkit
- The ability to ask Claude questions about real product data in natural language
- Claude that can run SQL queries and analyze e-commerce data for you
- A completely reproducible, shareable development environment
Prerequisites
Before we start, make sure you have:
- Docker Desktop 4.41.0+ with the MCP Toolkit Extension installed
- Node.js (v18 or later) for running the frontend
- Claude Desktop installed
- Basic familiarity with Docker and JavaScript/TypeScript
- Basic SQL knowledge
Setting Up the Sample Database
Instead of using an empty database, let's use a real example with actual data. We'll use a sample product catalog service:
# Clone the sample catalog service
git clone https://github.com/ajeetraina/catalog-service-node
cd catalog-service-node

# Start the backend services (includes Postgres with sample data)
docker compose up -d --build
This will spin up:
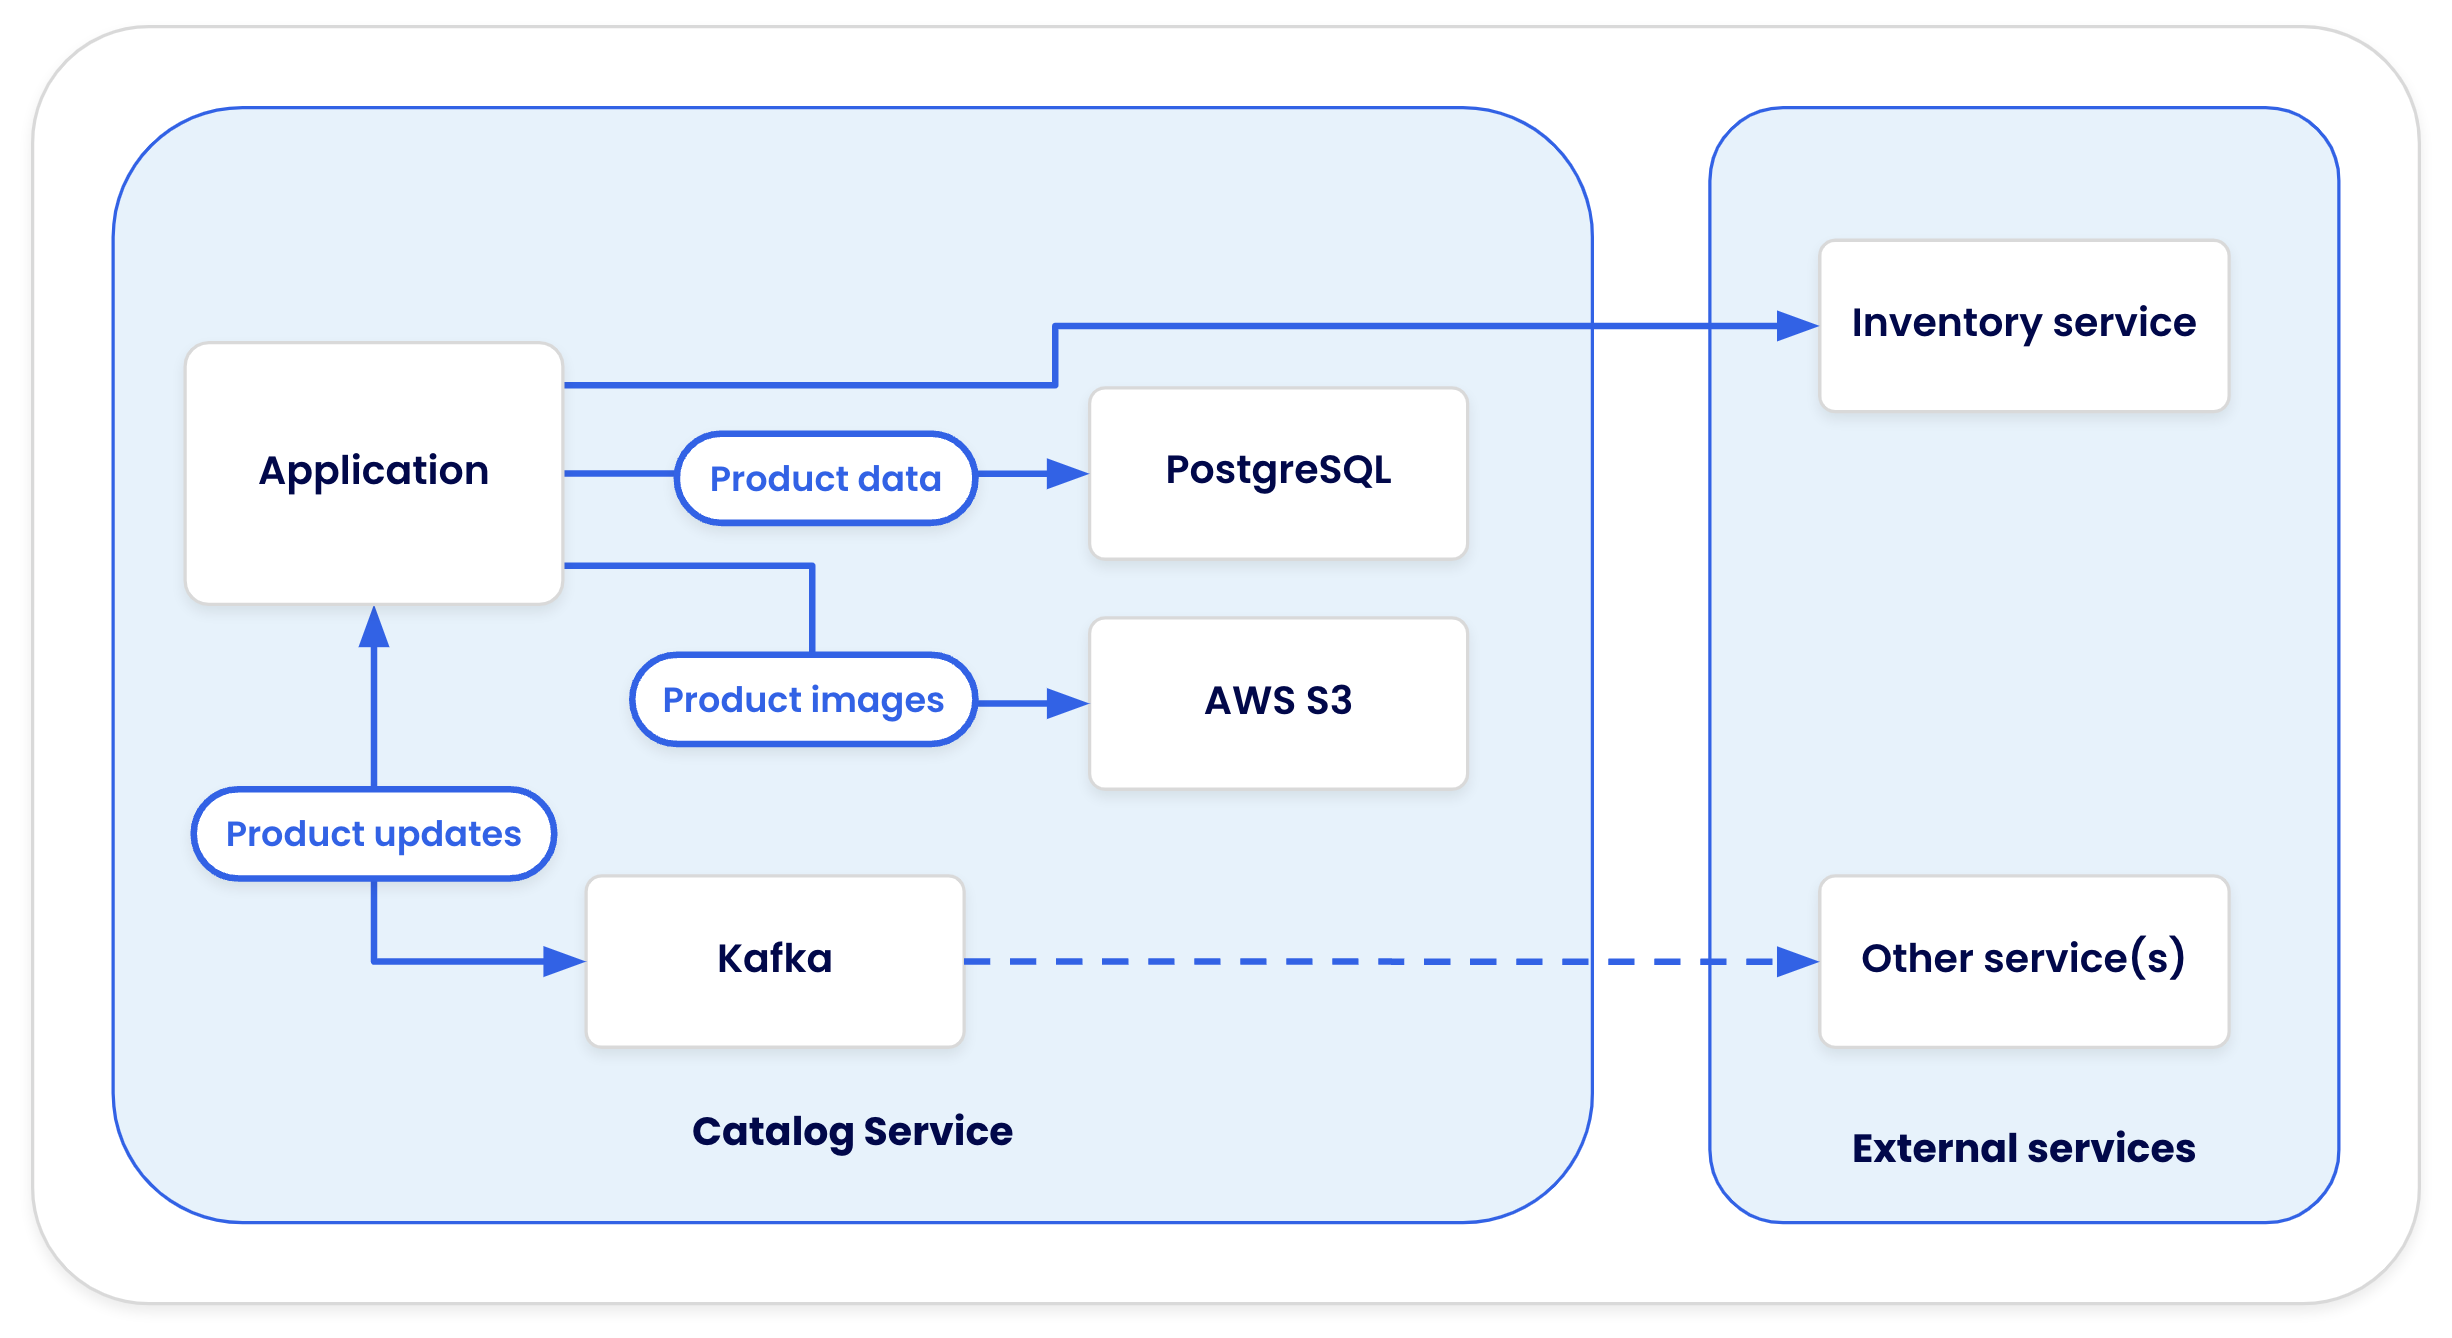
- A Postgres database on port 5432 with sample catalog data
- A Node.js backend service
- Sample data including products, categories, and inventory
Now let's bring up the frontend to see what data we're working with:
# Install frontend dependencies
npm install

# Start the development server
npm run dev
Open your browser to `http://localhost:5173 to see the catalog application. This gives you a visual understanding of the data structure we'll be querying with Claude.
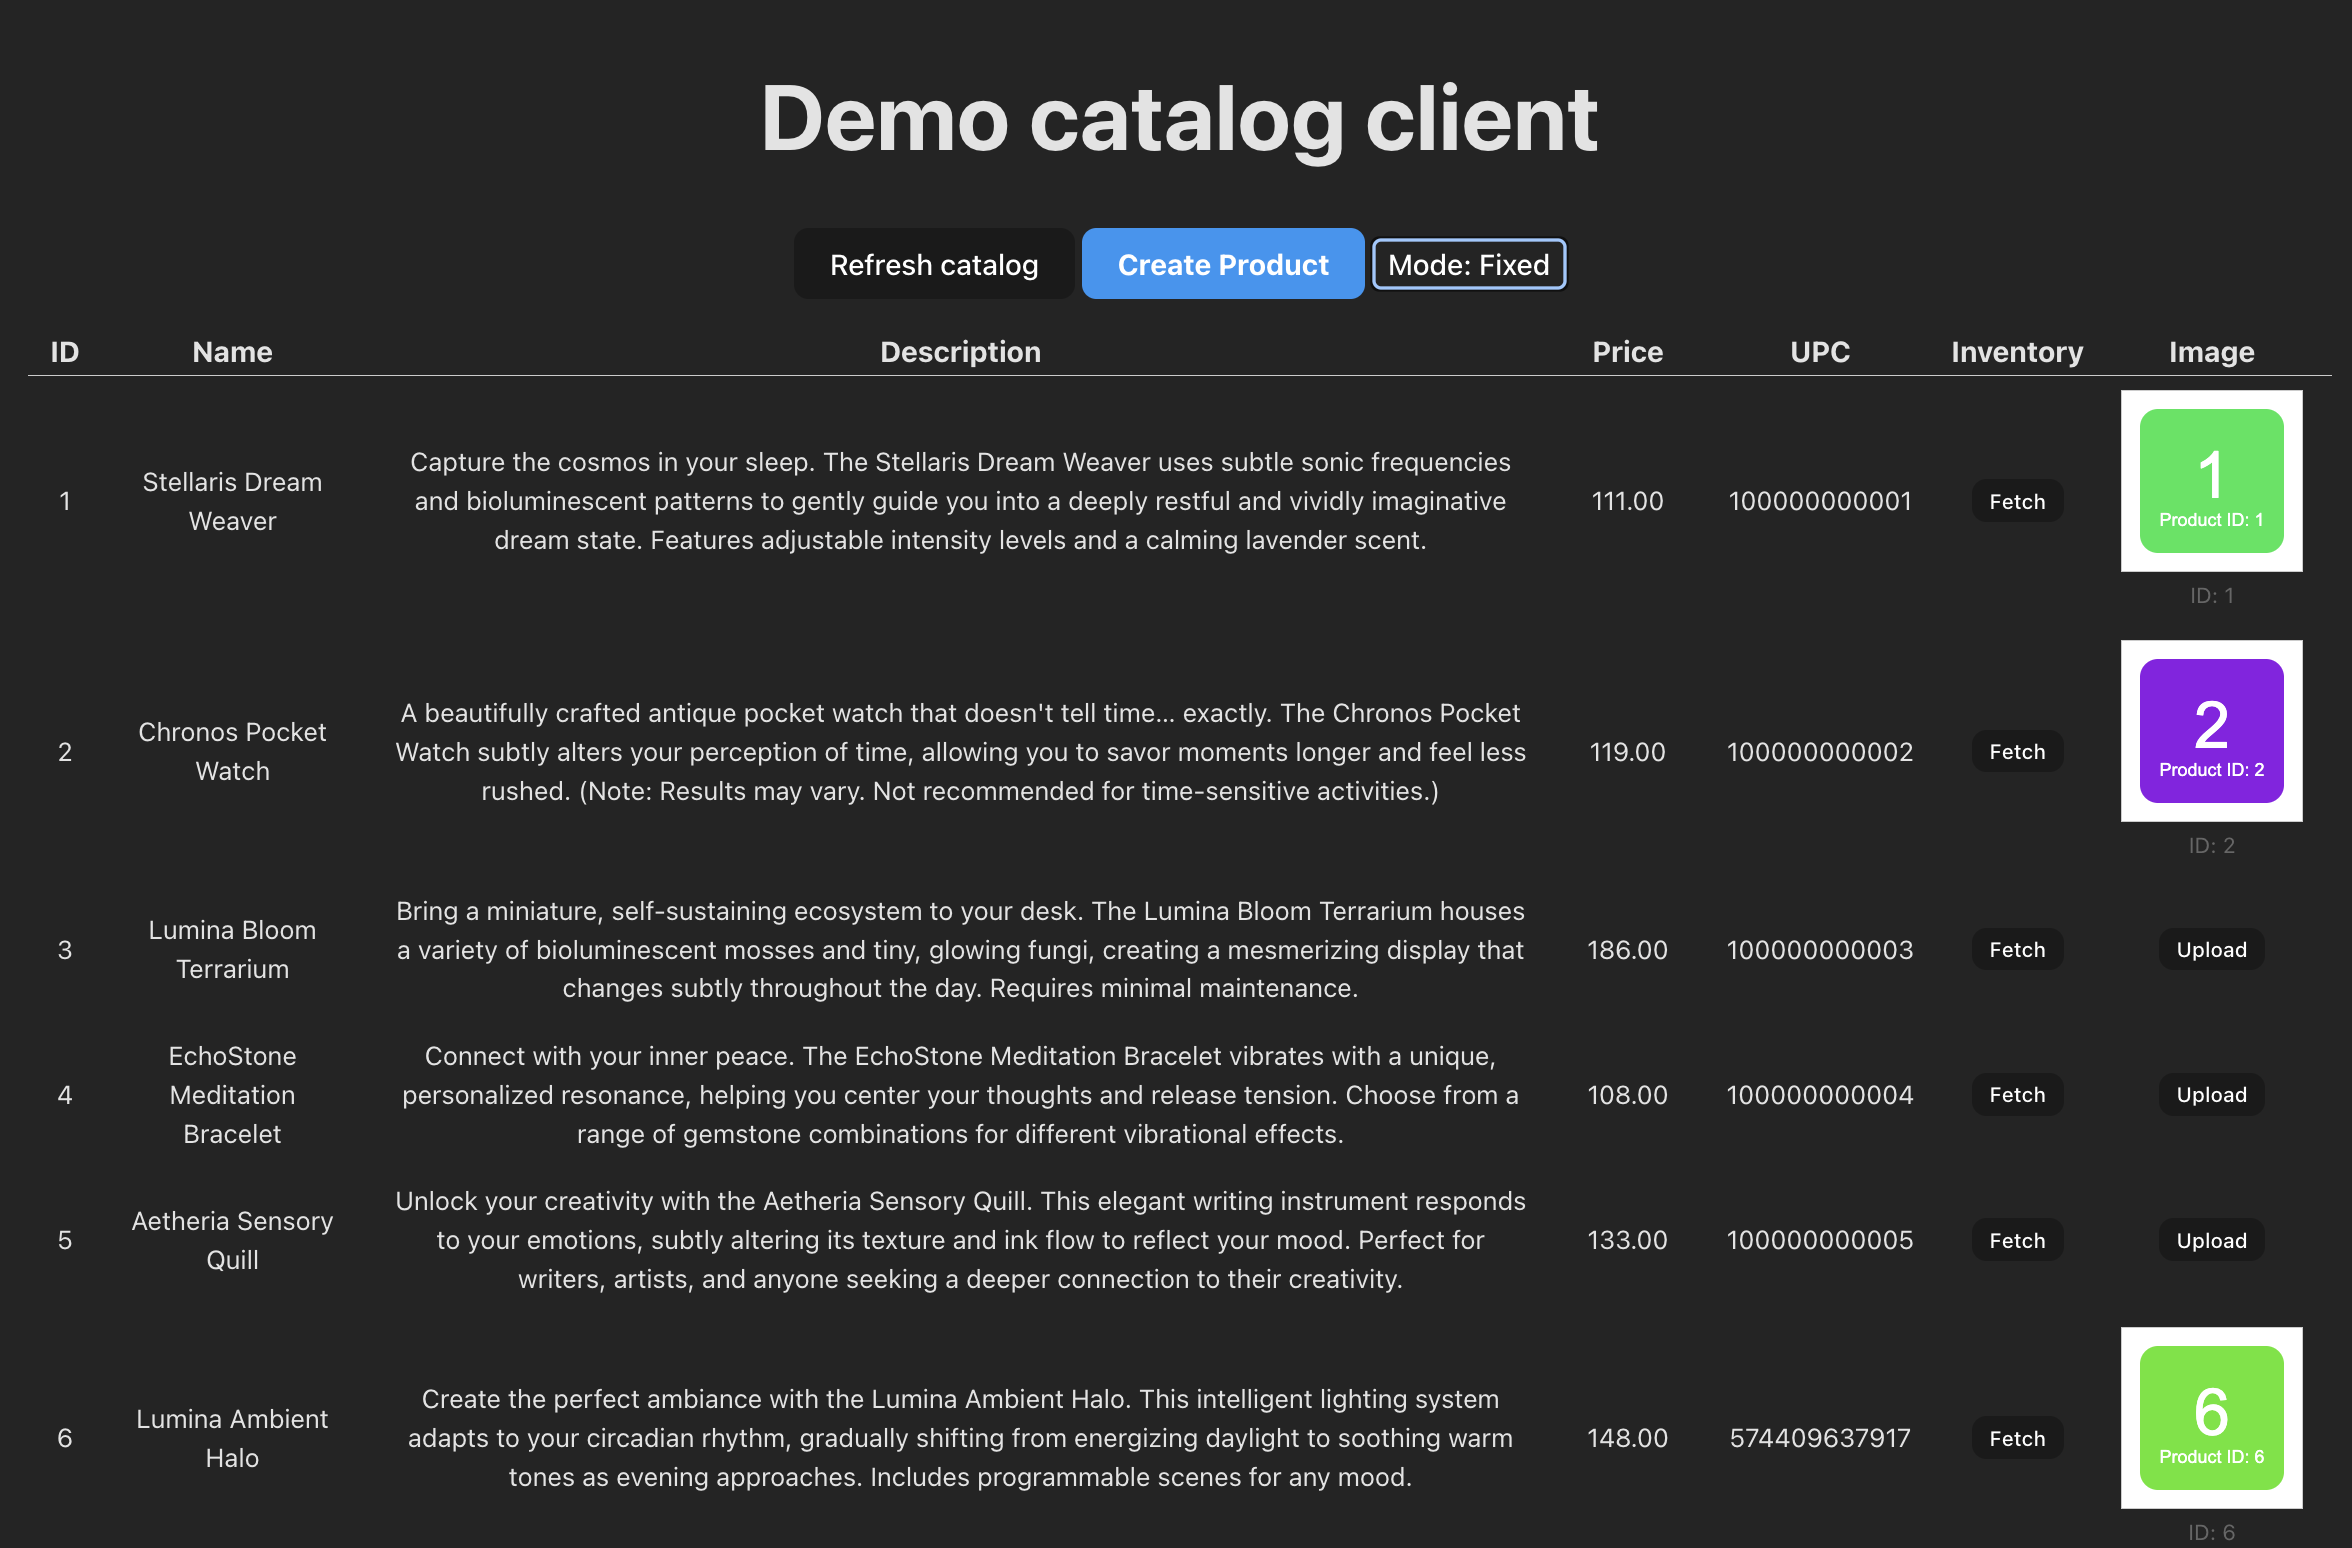
Hit "Create Product" button and start adding the new items to your Product catalog system.
Perfect! Now we have a realistic database to work with instead of an empty one.
Setting Up the MCP Server Project
Now let's create our MCP server project in a separate directory:
# Create MCP server project

mkdir postgres-mcp-server
cd postgres-mcp-server
npm init -y
npm install @modelcontextprotocol/sdk pg
npm install -D @types/node @types/pg typescript tsx
Create a basic TypeScript configuration:
// tsconfig.json
{
  "compilerOptions": {
    "target": "ES2022",
    "module": "Node16",
    "moduleResolution": "Node16",
    "outDir": "./dist",
    "rootDir": "./src",
    "esModuleInterop": true,
    "allowSyntheticDefaultImports": true,
    "strict": true,
    "skipLibCheck": true,
    "forceConsistentCasingInFileNames": true
  },
  "include": ["src/**/*"],
  "exclude": ["node_modules", "dist"]
}
Building the Containerized MCP Server
The key difference in a containerized setup is that our MCP server will connect to Postgres using the host networking, since we're connecting to an existing service. Create src/index.ts:
#!/usr/bin/env node

import { Server } from '@modelcontextprotocol/sdk/server/index.js';
import { StdioServerTransport } from '@modelcontextprotocol/sdk/server/stdio.js';
import {
  CallToolRequestSchema,
  ListToolsRequestSchema,
} from '@modelcontextprotocol/sdk/types.js';
import { Pool } from 'pg';

// Database configuration for container networking
const pool = new Pool({
  host: process.env.POSTGRES_HOST || 'host.docker.internal', // Connect to the catalog-service database
  port: parseInt(process.env.POSTGRES_PORT || '5432'),
  database: process.env.POSTGRES_DB || 'catalog',
  user: process.env.POSTGRES_USER || 'postgres',
  password: process.env.POSTGRES_PASSWORD || 'postgres',
});

const server = new Server(
  {
    name: 'postgres-mcp-server',
    version: '0.1.0',
  },
  {
    capabilities: {
      tools: {},
    },
  }
);

// Define our tools
server.setRequestHandler(ListToolsRequestSchema, async () => {
  return {
    tools: [
      {
        name: 'query',
        description: 'Run a read-only SQL query against the Postgres database',
        inputSchema: {
          type: 'object',
          properties: {
            sql: {
              type: 'string',
              description: 'The SQL query to execute (SELECT statements only)',
            },
          },
          required: ['sql'],
        },
      },
      {
        name: 'describe_table',
        description: 'Get the schema information for a specific table',
        inputSchema: {
          type: 'object',
          properties: {
            table_name: {
              type: 'string',
              description: 'The name of the table to describe',
            },
          },
          required: ['table_name'],
        },
      },
      {
        name: 'list_tables',
        description: 'List all tables in the database',
        inputSchema: {
          type: 'object',
          properties: {},
        },
      },
    ],
  };
});

// Handle tool calls
server.setRequestHandler(CallToolRequestSchema, async (request) => {
  const { name, arguments: args } = request.params;

  try {
    switch (name) {
      case 'query': {
        const { sql } = args as { sql: string };

        // Security: Only allow SELECT statements
        const trimmedSql = sql.trim().toLowerCase();
        if (!trimmedSql.startsWith('select')) {
          throw new Error('Only SELECT queries are allowed');
        }

        const result = await pool.query(sql);
        return {
          content: [
            {
              type: 'text',
              text: JSON.stringify({
                rows: result.rows,
                rowCount: result.rowCount,
                fields: result.fields.map(field => ({
                  name: field.name,
                  dataTypeID: field.dataTypeID
                }))
              }, null, 2),
            },
          ],
        };
      }

      case 'describe_table': {
        const { table_name } = args as { table_name: string };

        const result = await pool.query(`
          SELECT
            column_name,
            data_type,
            is_nullable,
            column_default,
            character_maximum_length
          FROM information_schema.columns
          WHERE table_name = $1
          ORDER BY ordinal_position
        `, [table_name]);

        return {
          content: [
            {
              type: 'text',
              text: JSON.stringify(result.rows, null, 2),
            },
          ],
        };
      }

      case 'list_tables': {
        const result = await pool.query(`
          SELECT
            table_name,
            table_type
          FROM information_schema.tables
          WHERE table_schema = 'public'
          ORDER BY table_name
        `);

        return {
          content: [
            {
              type: 'text',
              text: JSON.stringify(result.rows, null, 2),
            },
          ],
        };
      }

      default:
        throw new Error(`Unknown tool: ${name}`);
    }
  } catch (error) {
    return {
      content: [
        {
          type: 'text',
          text: `Error: ${error instanceof Error ? error.message : String(error)}`,
        },
      ],
      isError: true,
    };
  }
});

// Start the server in STDIO mode (socat handles TCP conversion)
async function main() {
  const transport = new StdioServerTransport();
  await server.connect(transport);
  console.error('Postgres MCP server running on stdio');
}

main().catch((error) => {
  console.error('Server error:', error);
  process.exit(1);
});
Docker Configuration
Create a Dockerfile for your MCP server:
FROM node:18-alpine

WORKDIR /app

# Copy package files
COPY package*.json ./
RUN npm ci --only=production

# Copy source and build
COPY src/ ./src/
COPY tsconfig.json ./
RUN npm install typescript tsx && npm run build

# Label for MCP Toolkit discovery
LABEL mcp.server="postgres-mcp-server"

EXPOSE 8811

# Start with socat wrapping the MCP server for TCP communication
CMD ["sh", "-c", "socat TCP-LISTEN:8811,reuseaddr,fork EXEC:'node dist/index.js'"]
Create your docker-compose.yml (note: this connects to your existing Postgres container):
services:
  postgres-mcp-server:
    build: .
    container_name: postgres-mcp-server
    environment:
      # Connect to your existing Postgres container
      POSTGRES_HOST: host.docker.internal  # Access host's localhost
      POSTGRES_PORT: 5432
      POSTGRES_DB: catalog
      POSTGRES_USER: postgres
      POSTGRES_PASSWORD: postgres
    ports:
      - "8811:8811"
    labels:
      - "mcp.client=claude-desktop"
    # Use host networking to connect to your existing Postgres on localhost:5432
    extra_hosts:
      - "host.docker.internal:host-gateway"
If your existing Postgres container has a specific name and you want to connect directly to it, you can alternatively use:
services:
  postgres-mcp-server:
    build: .
    container_name: postgres-mcp-server
    environment:
      POSTGRES_HOST: your-postgres-container-name  # Replace with actual container name
      POSTGRES_PORT: 5432
      POSTGRES_DB: catalog
      POSTGRES_USER: postgres
      POSTGRES_PASSWORD: postgres
    ports:
      - "8811:8811"
    labels:
      - "mcp.client=claude-desktop"
    # Connect to existing container's network
    network_mode: "container:your-postgres-container-name"
Update your package.json with build scripts:
{
  "scripts": {
    "build": "tsc",
    "start": "node dist/index.js",
    "dev": "tsx src/index.ts"
  }
}
Connecting to the Catalog Service Database
Now that you have the catalog service running, let's verify the database connection:
# Find the catalog service Postgres container
docker ps | grep postgres

# Should show something like:
# catalog-service-node-db-1   postgres:15   ...   0.0.0.0:5432->5432/tcp
Test the connection to the catalog database:
# Connect to the catalog database
docker exec -it catalog-service-node-db-1 psql -U postgres -d catalog

# Once connected, explore the sample data:
# \dt                    -- List all tables
# SELECT * FROM products LIMIT 5;  -- See sample products
# \q                     -- Quit
You should see tables like products, categories, inventory, etc. with real sample data that makes the MCP integration much more interesting!
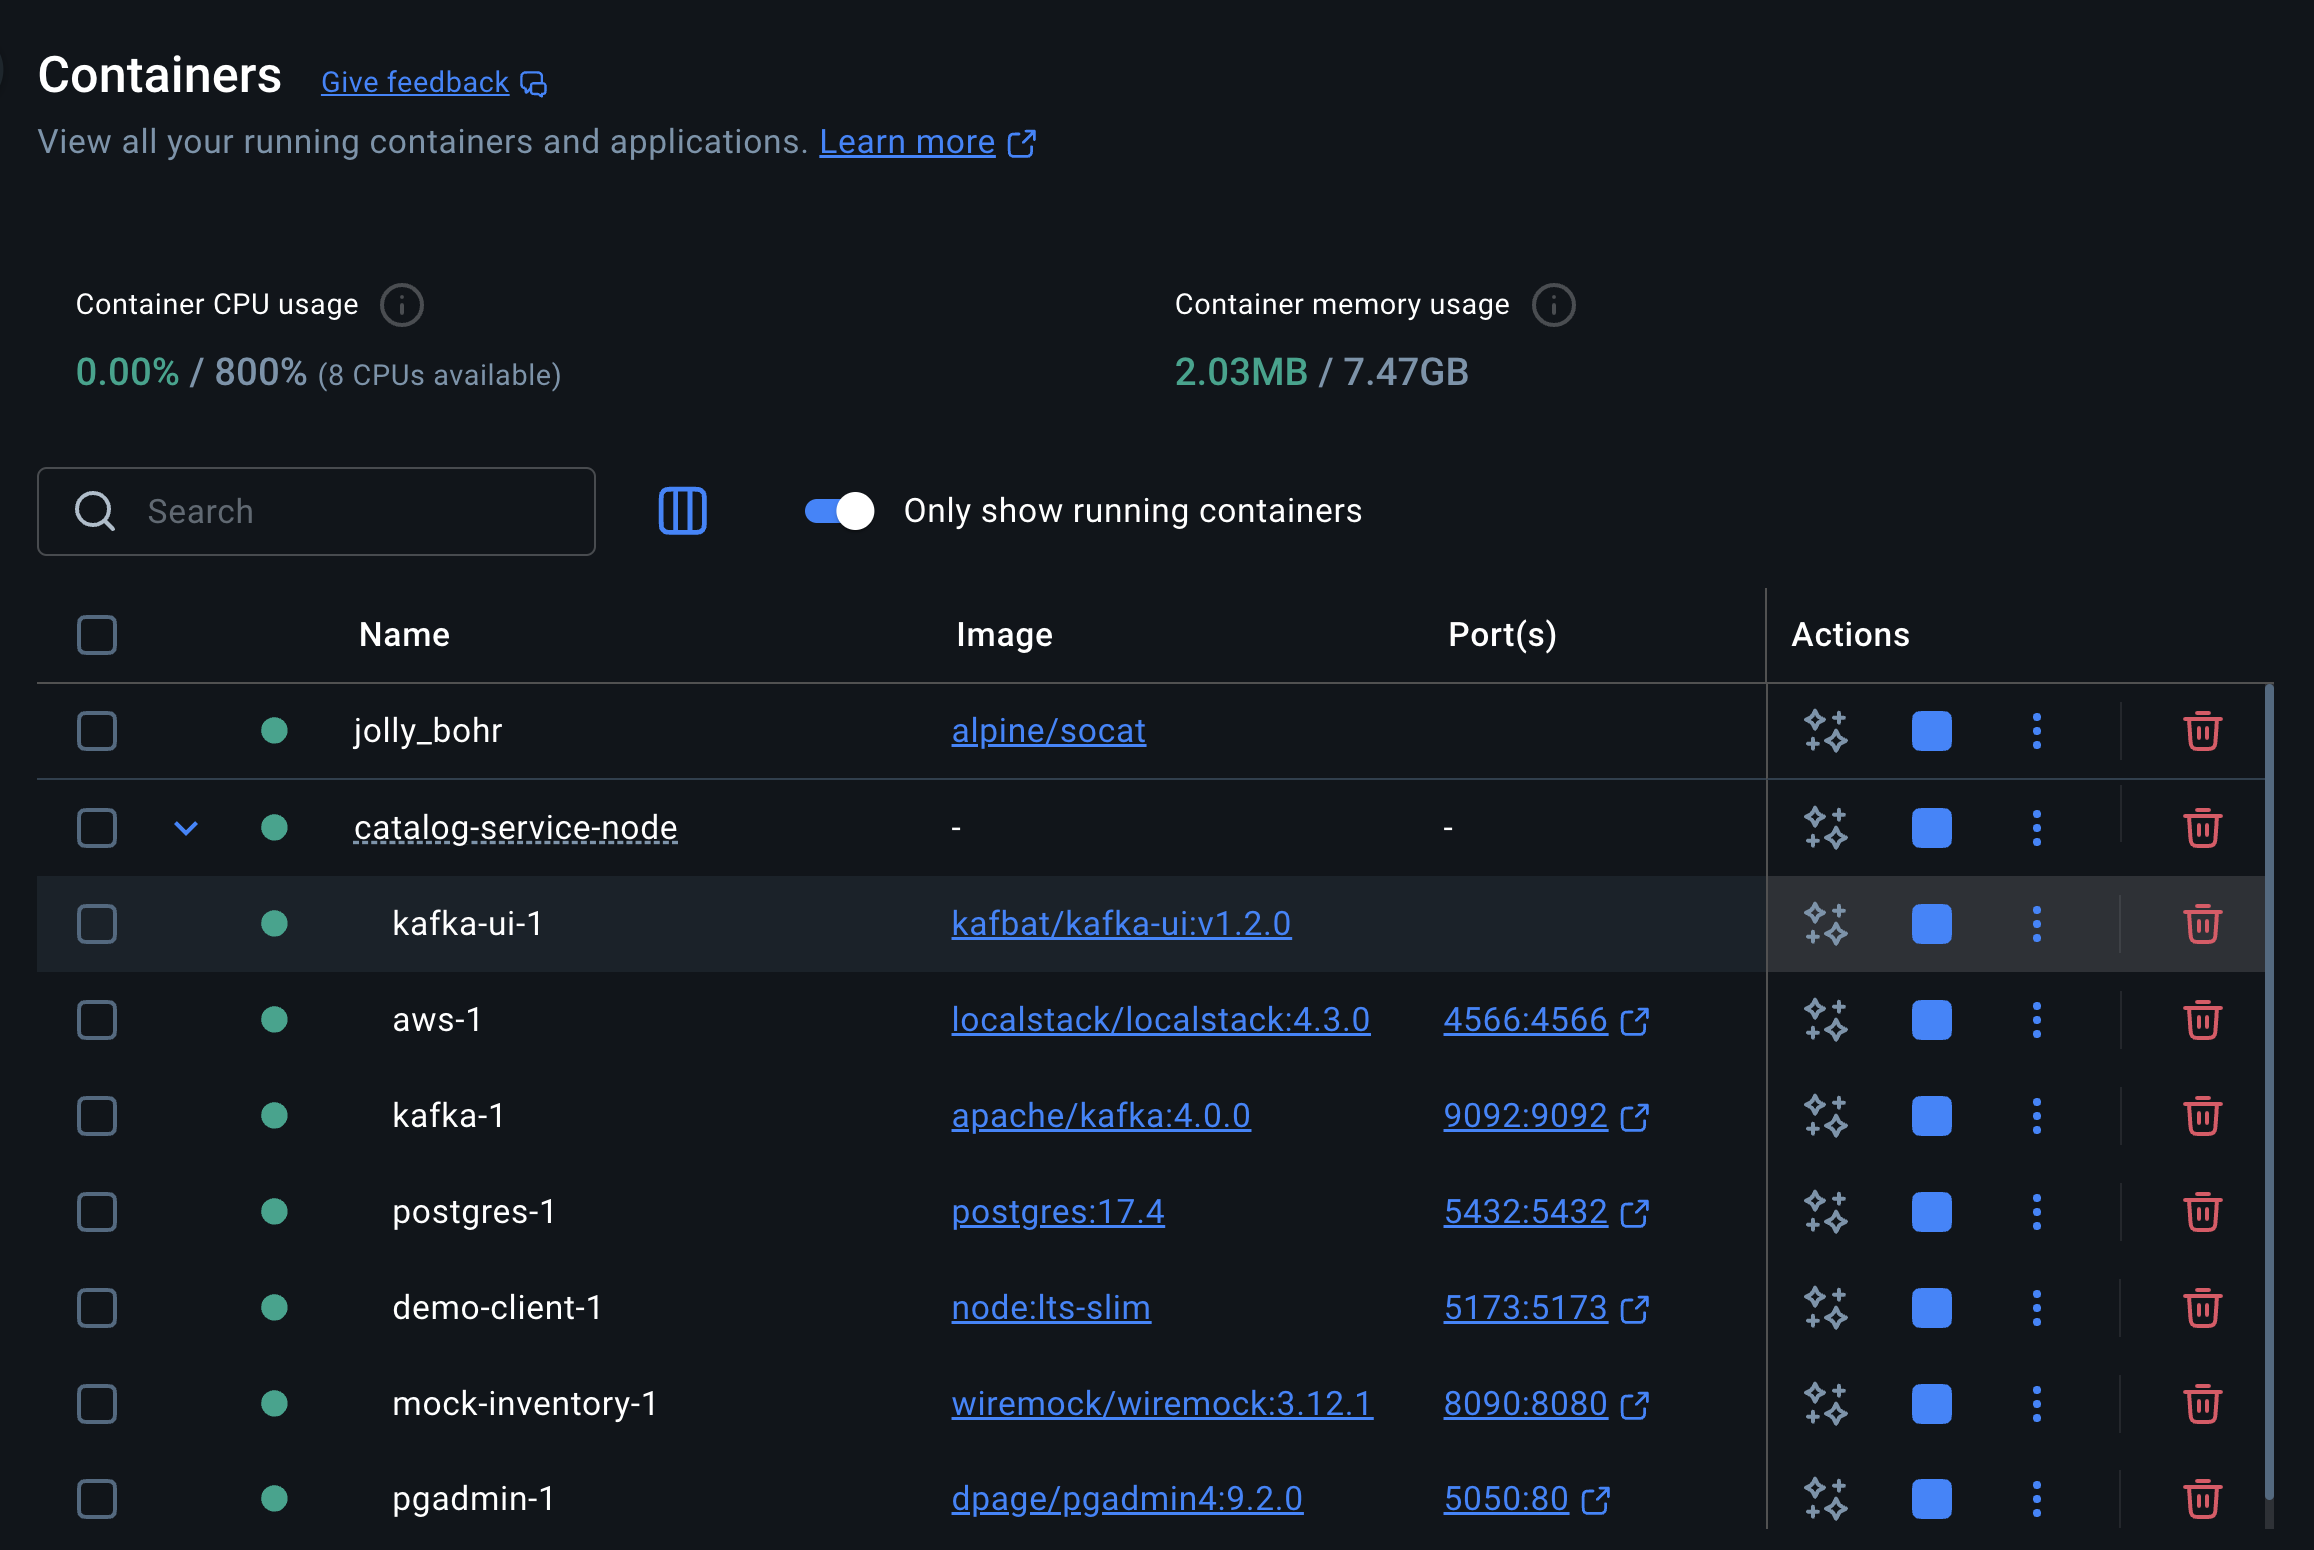
Configuring with Docker Desktop MCP Toolkit
Instead of manually managing containers, I used the Docker Desktop MCP Toolkit Extension, which provides a beautiful UI for managing MCP servers and clients.
Deploy Your MCP Server
Since you already have Postgres running, you only need to build and start your MCP server:
# Build and start your MCP server (connects to existing Postgres)
docker-compose up -d

# Verify it's running and can connect to your database
docker logs postgres-mcp-server

# Test the connection
docker exec -it postgres-mcp-server node -e "
const { Pool } = require('pg');
const pool = new Pool({
  host: 'host.docker.internal',
  port: 5432,
  database: 'catalog',
  user: 'postgres',
  password: 'postgres'
});
pool.query('SELECT version()').then(r => console.log('✅ Connected:', r.rows[0].version)).catch(e => console.log('❌ Error:', e.message));
"
Using Docker Desktop MCP Toolkit
- Install the MCP Toolkit Extension in Docker Desktop (if not already installed)
If you run docker mcp client -g and the extension isn't installed, you'll be prompted to install it:
docker mcp client ls -g
Result:
The Docker Desktop Extension to run the MCP Catalog is not installed.
Do you want to install the extension now? (Y/n): Y
Checking for latest version of MCP Catalog extension... Ok (0.2.51)
Installing MCP Catalog extension, this might take a bit... Ok
=== Project-wide MCP Configurations (/Users/../..) ===
● cursor: no mcp configured
● vscode: no mcp configured
- Open Docker Desktop → Navigate to "MCP Toolkit"
- You'll see two tabs: "MCP Servers" and "MCP Clients"
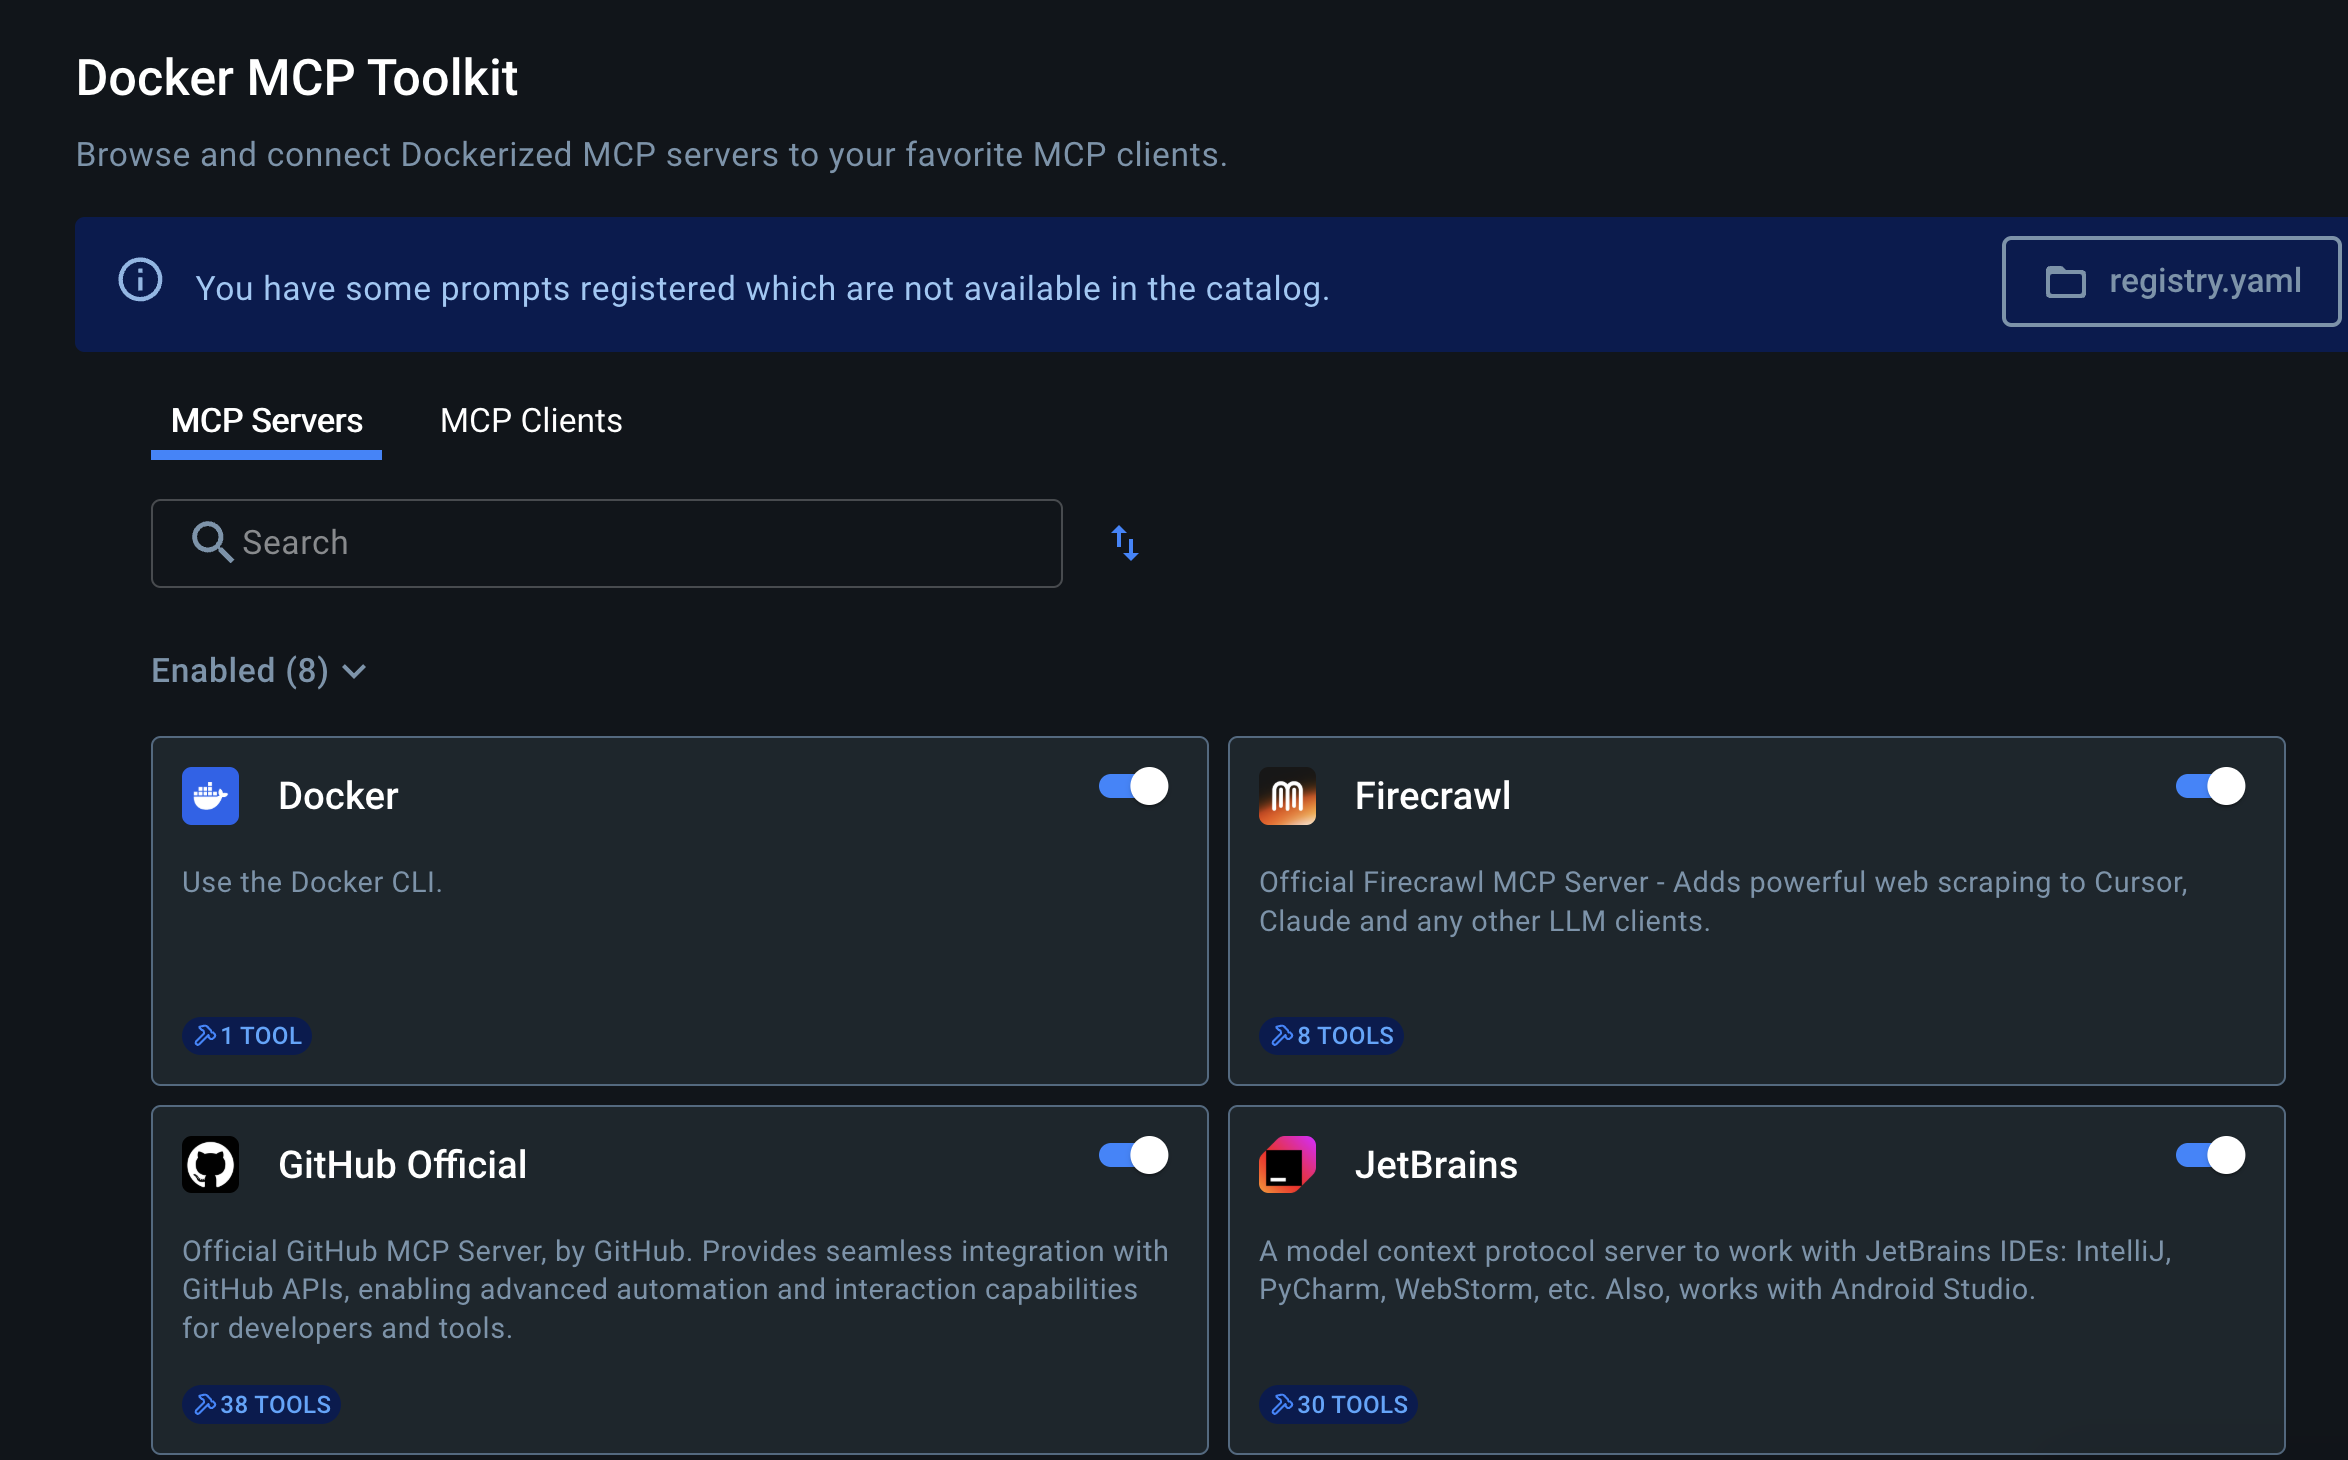
Find Claude Desktop in the MCP Clients list
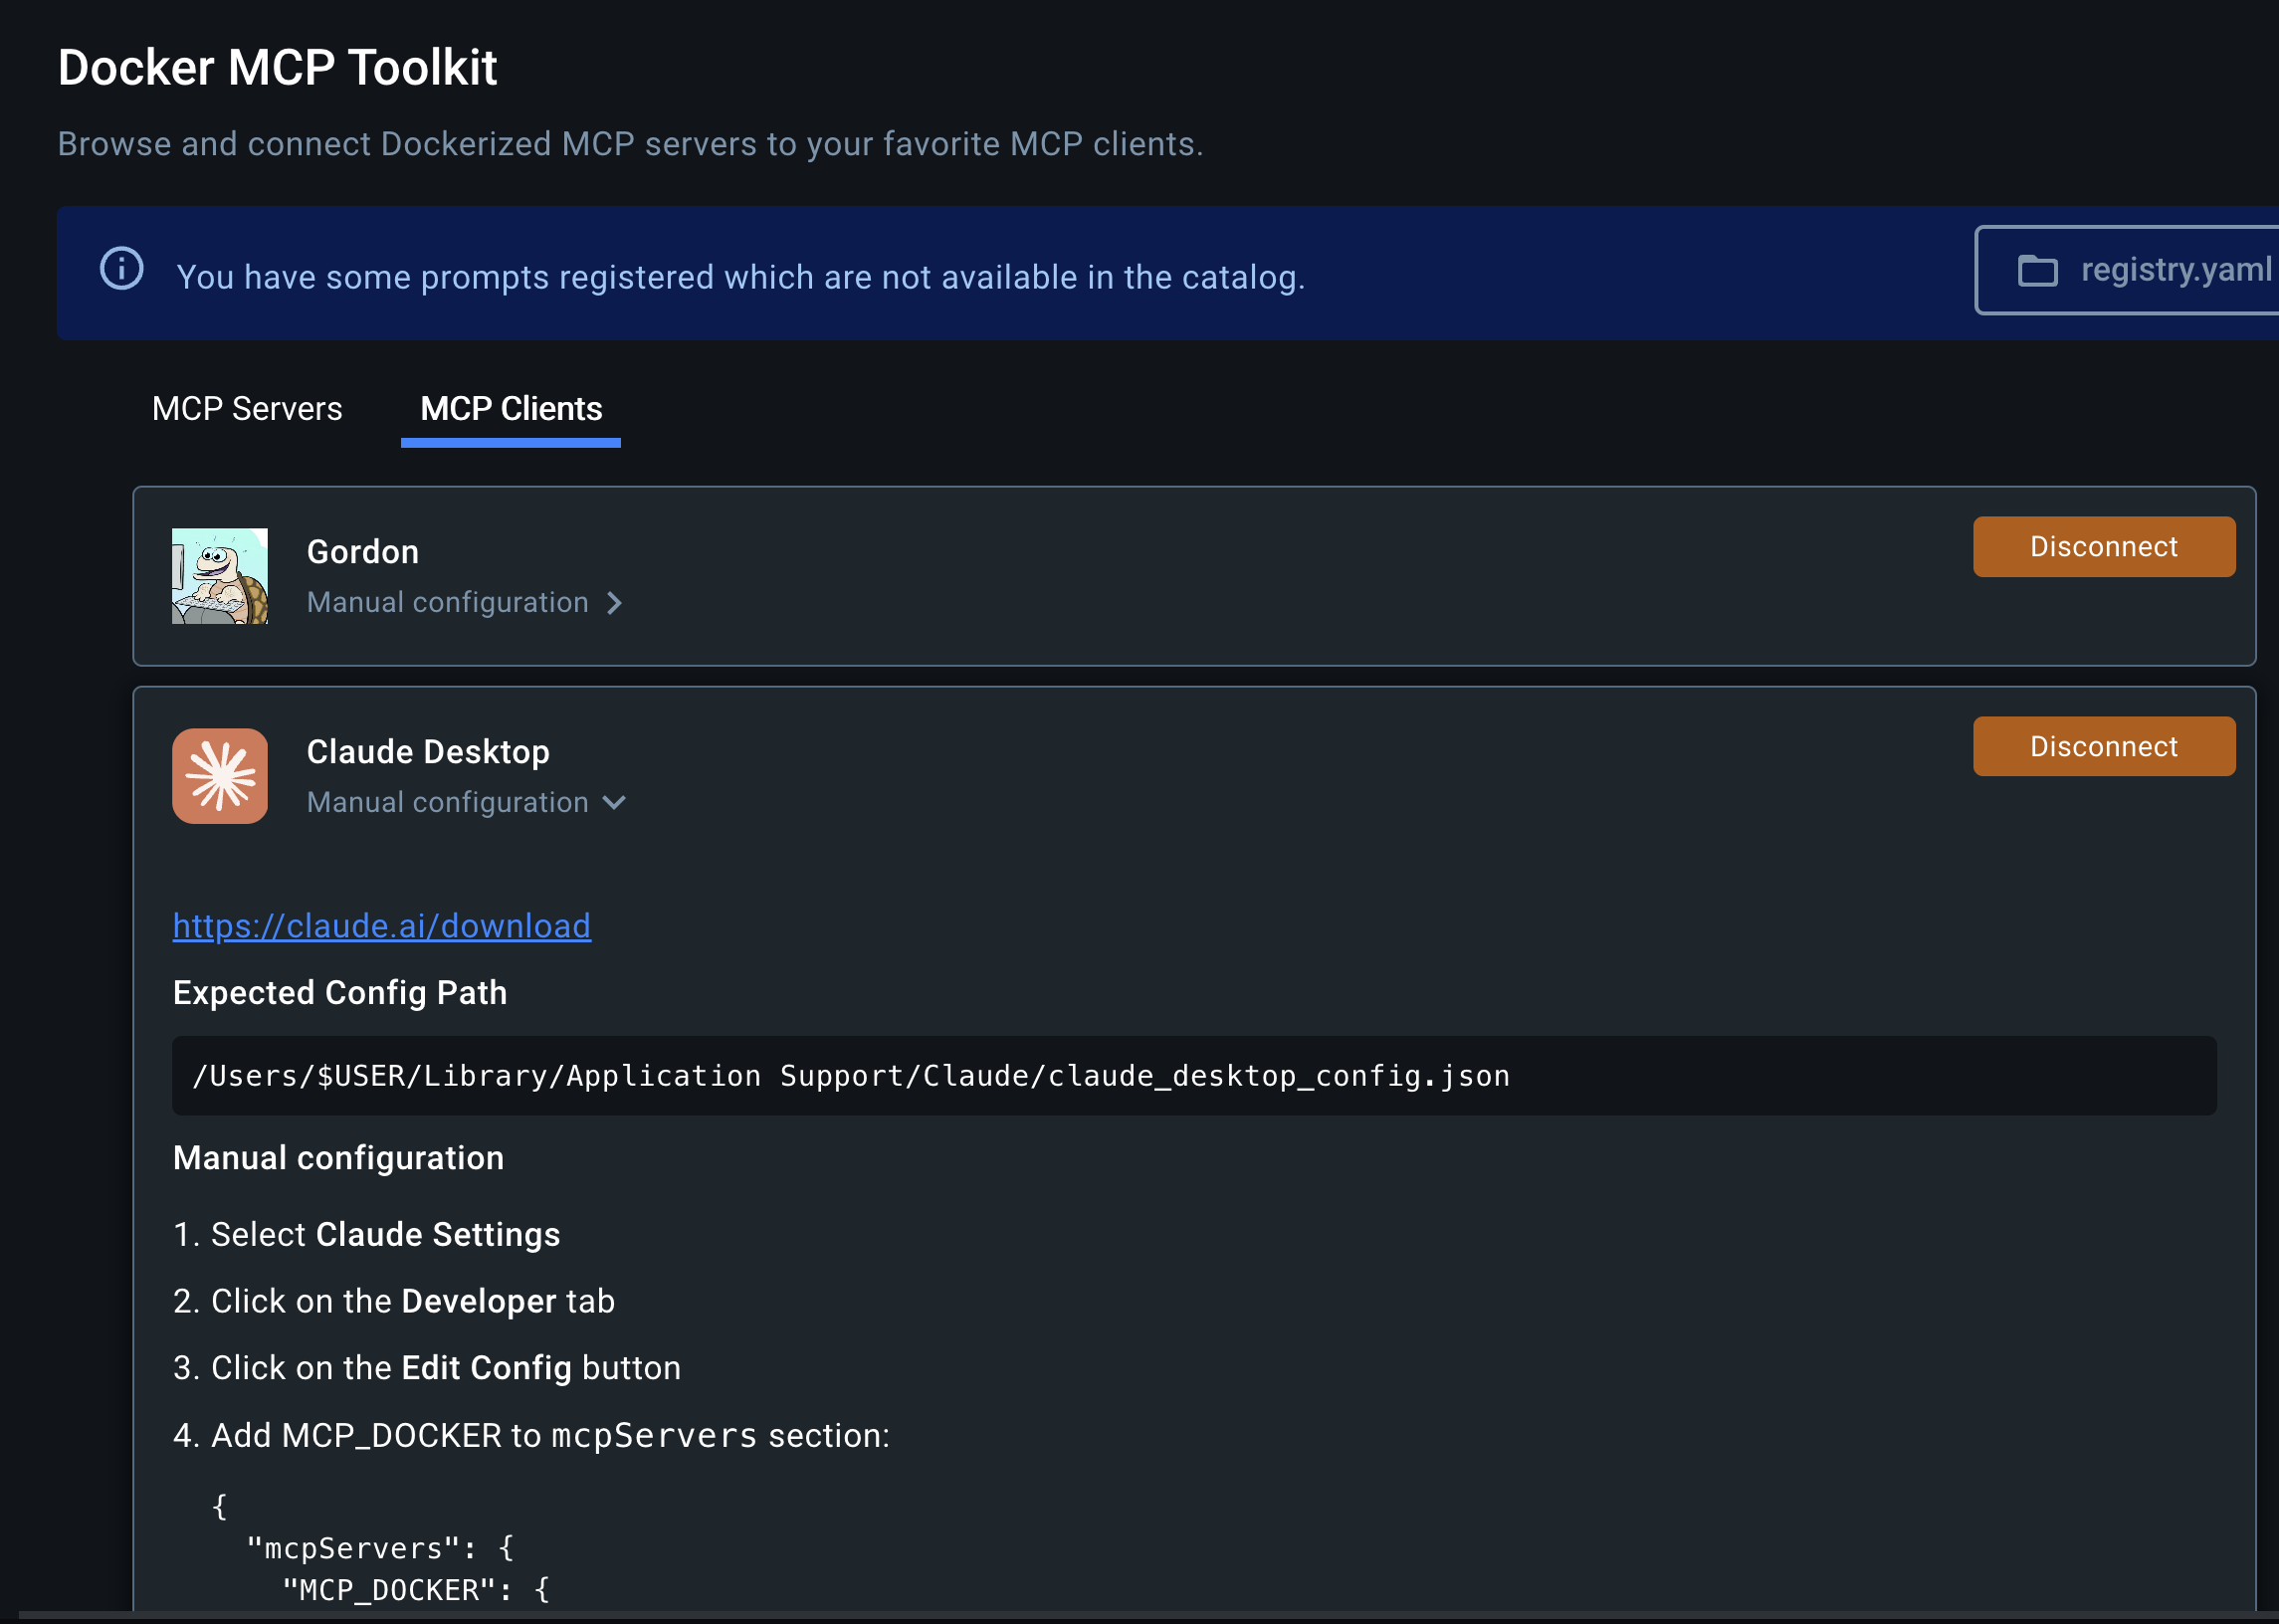
Click the dropdown next to "Manual configuration"
The interface shows you exactly what to add to your Claude config:
{
  "mcpServers": {
    "MCP_DOCKER": {
      "command": "docker",
      "args": [
        "run",
        "-l",
        "mcp.client=claude-desktop",
        "--rm",
        "-i",
        "alpine/socat",
        "STDIO",
        "TCP:host.docker.internal:8811"
      ]
    }
  }
}
Add this to your Claude Desktop configuration file:
- macOS:
~/Library/Application Support/Claude/claude_desktop_config.json - Windows:
%APPDATA%\Claude\claude_desktop_config.json
Testing the Integration
Restart Claude Desktop, and you should see a small hammer icon (🔨) indicating that MCP tools are available.
Now you can start asking Claude questions about the catalog service database:
- "What tables do I have in my catalog database?"
- "Show me some sample products from the products table"
- "How many products are in each category?"
- "What's the average price of products?"
- "Show me the structure of the products table"
- "Which products are currently out of stock?"
- "Find the most expensive products in the database"
Claude will use your containerized MCP server to query the catalog database and provide insights based on the actual e-commerce sample data. This is much more interesting than an empty database!
What I Learned
Building this containerized MCP server taught me several valuable lessons:
- Container Networking: The biggest mindset shift was understanding that
POSTGRES_HOSTshould be the container name ("postgres") rather than"localhost"when everything runs in Docker. - MCP Toolkit Benefits: The Docker Desktop MCP Toolkit Extension transforms the experience from manually managing containers to a clean UI with automatic discovery.
- Socat Magic: The
alpine/socatcontainer elegantly bridges Claude Desktop's STDIO interface with TCP-based containerized services. - Configuration Simplicity: Once set up, the
MCP_DOCKERconfiguration in Claude is remarkably simple and reliable. - Reproducible Environments: Docker Compose makes the entire stack (database + MCP server) easily shareable and version-controlled.
Challenges I Encountered
- Connecting to Existing Container: Initially tried to create a new Postgres container instead of connecting to my existing one
- Host Networking: Understanding that
host.docker.internalwas needed to reach the host's localhost:5432 from within the container - Container Name Discovery: Finding the exact name of my existing Postgres container using
docker ps - Port Configuration: Understanding that port 8811 needed to be exposed for socat communication
- Docker Desktop Extension: Finding and installing the MCP Toolkit Extension (it's in the Extensions marketplace)
- Config Validation: Making sure the exact
MCP_DOCKERkey name matched what the toolkit expected
The Docker Desktop MCP Toolkit Advantage
Using Docker Desktop's MCP Toolkit Extension provided several major benefits:
- Visual Management: See all your MCP servers and clients in one place
- Connection Status: Know immediately which clients are connected/disconnected
- Configuration Help: Get exact config snippets instead of guessing syntax
- Container Discovery: Automatically finds MCP servers with proper labels
- Easy Debugging: View logs and container status without CLI commands
This approach is far superior to manually managing containers and configurations!
Next Steps and Improvements
This containerized implementation could be extended with:
- Support for multiple databases
- Query result caching
- More sophisticated security controls
- Custom functions for common business logic
- Integration with database monitoring tools
- Multi-environment deployments (dev/staging/prod)
Conclusion
Building a containerized MCP server for Postgres using Docker Desktop's MCP Toolkit Extension and connecting it to a real sample application was both easier and more powerful than I expected. Using Docker's catalog-service-node example provided realistic e-commerce data that made the integration immediately useful and engaging.
The combination of:
- Real sample data from Docker's catalog service for meaningful queries
- Containerized architecture for reproducible environments
- Docker Desktop's MCP Toolkit UI for easy management
- Claude's natural language interface for database queries
- Socat bridging for seamless STDIO ↔ TCP communication
...creates an incredibly robust and user-friendly setup for data exploration.
Having Claude directly query a realistic e-commerce database with products, categories, and inventory data opens up new possibilities for data analysis and business insights. The natural language interface means I can ask questions like "Which products are selling best?" or "What categories need restocking?" without writing complex SQL, while still having the flexibility to review and modify the generated queries.
If you work with databases regularly and use Docker Desktop, I highly recommend starting with a real sample application like catalog-service-node and adding MCP integration. It's a game-changer for how you interact with your data, and the UI makes the whole setup surprisingly straightforward.