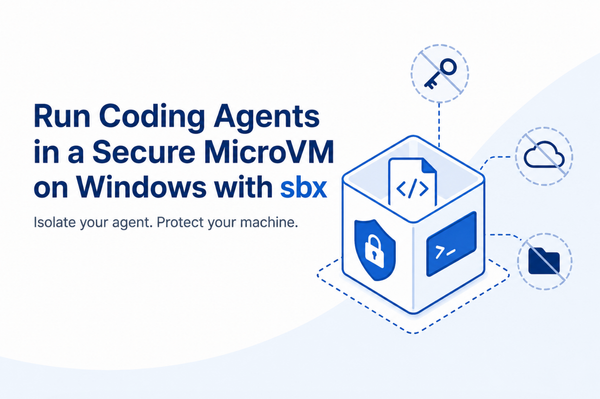
10 Things You Must Know About Docker Sandboxes
Docker Sandboxes give AI coding agents a real isolation boundary: a microVM with its own kernel, its own Docker daemon, and a proxy that mediates every outbound request. Most of what makes them genuinely useful isn't on the front page. Here are ten things worth knowing before you run your first one.

Docker Sandboxes give AI coding agents a real isolation boundary. Each one boots a microVM with its own kernel, its own Docker daemon, and a proxy that mediates every outbound request. Most of what makes them genuinely useful is not on the front page.
Here are ten things worth knowing before you run your first one.

1. microVM Hypervisor Isolation, Not Container Namespaces
Sandboxes are not containers. Each one boots a lightweight microVM with its own dedicated Linux kernel. That is full hypervisor isolation, not the namespace-and-cgroup variety you get from a container.
The docs lay out the comparison clearly:
| Approach | Isolation | Docker access |
|---|---|---|
| Sandboxes (microVMs) | Full hypervisor boundary | Isolated daemon |
| Container with socket mount | Partial namespace isolation | Shared host daemon |
| Docker-in-Docker | Partial privileged container | Nested daemon |
| Host execution | None | Host daemon |
Sandboxes trade higher resource overhead for complete isolation. Reach for one when you want to give something autonomous full Docker capabilities without trusting it with your host environment.
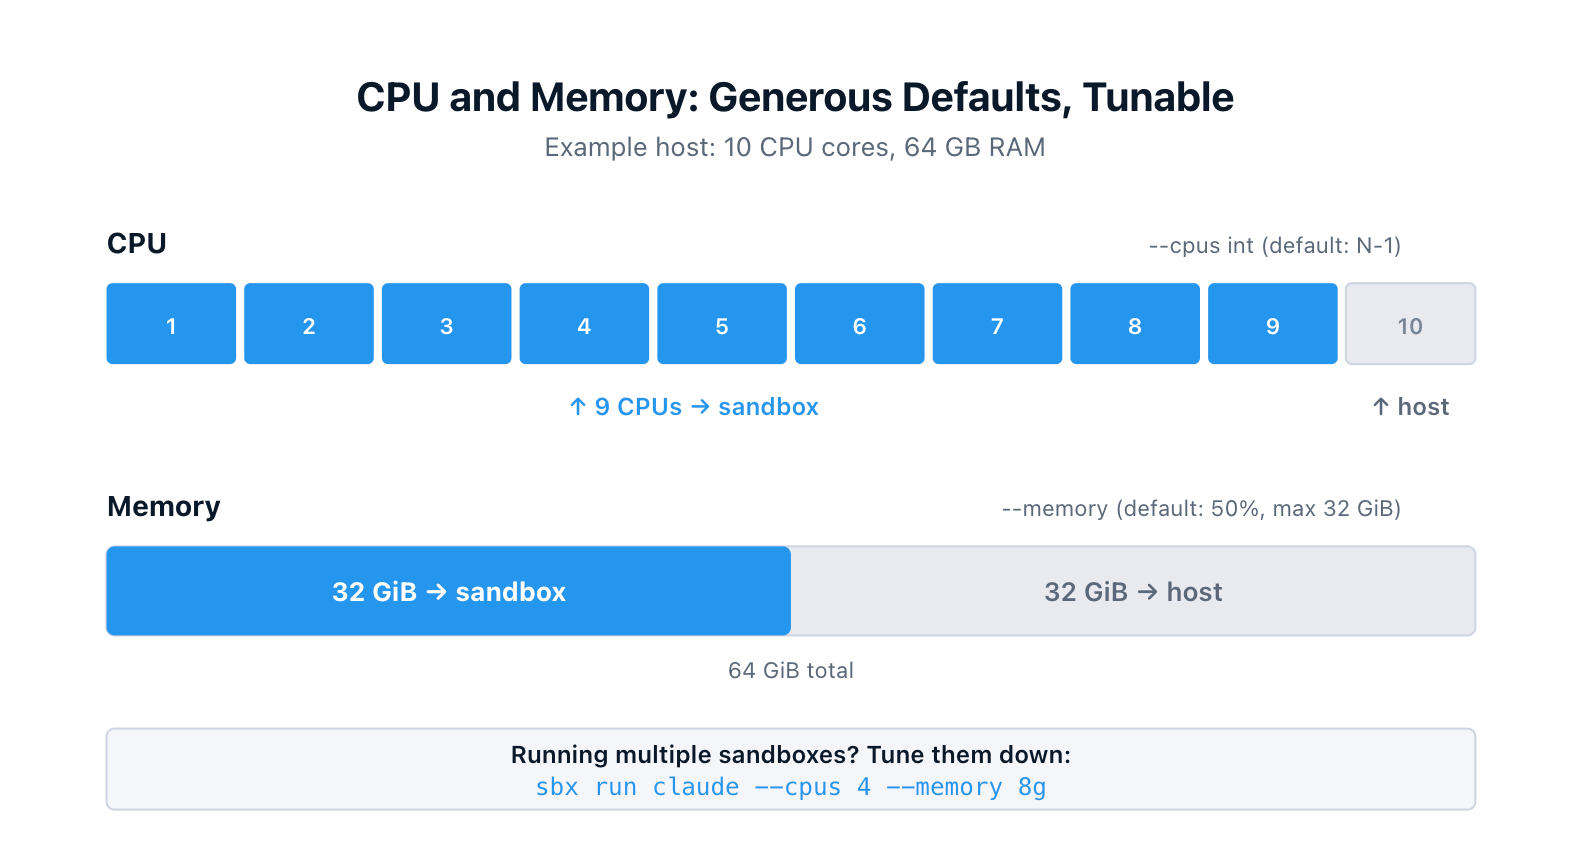
2. CPU and Memory Allocation: Generous Defaults, Tunable Per Sandbox
Each sandbox is a real VM, so it needs a real slice of your host's CPU and memory. The CLI gives you control over both, with defaults that assume the sandbox is the main thing you're running.
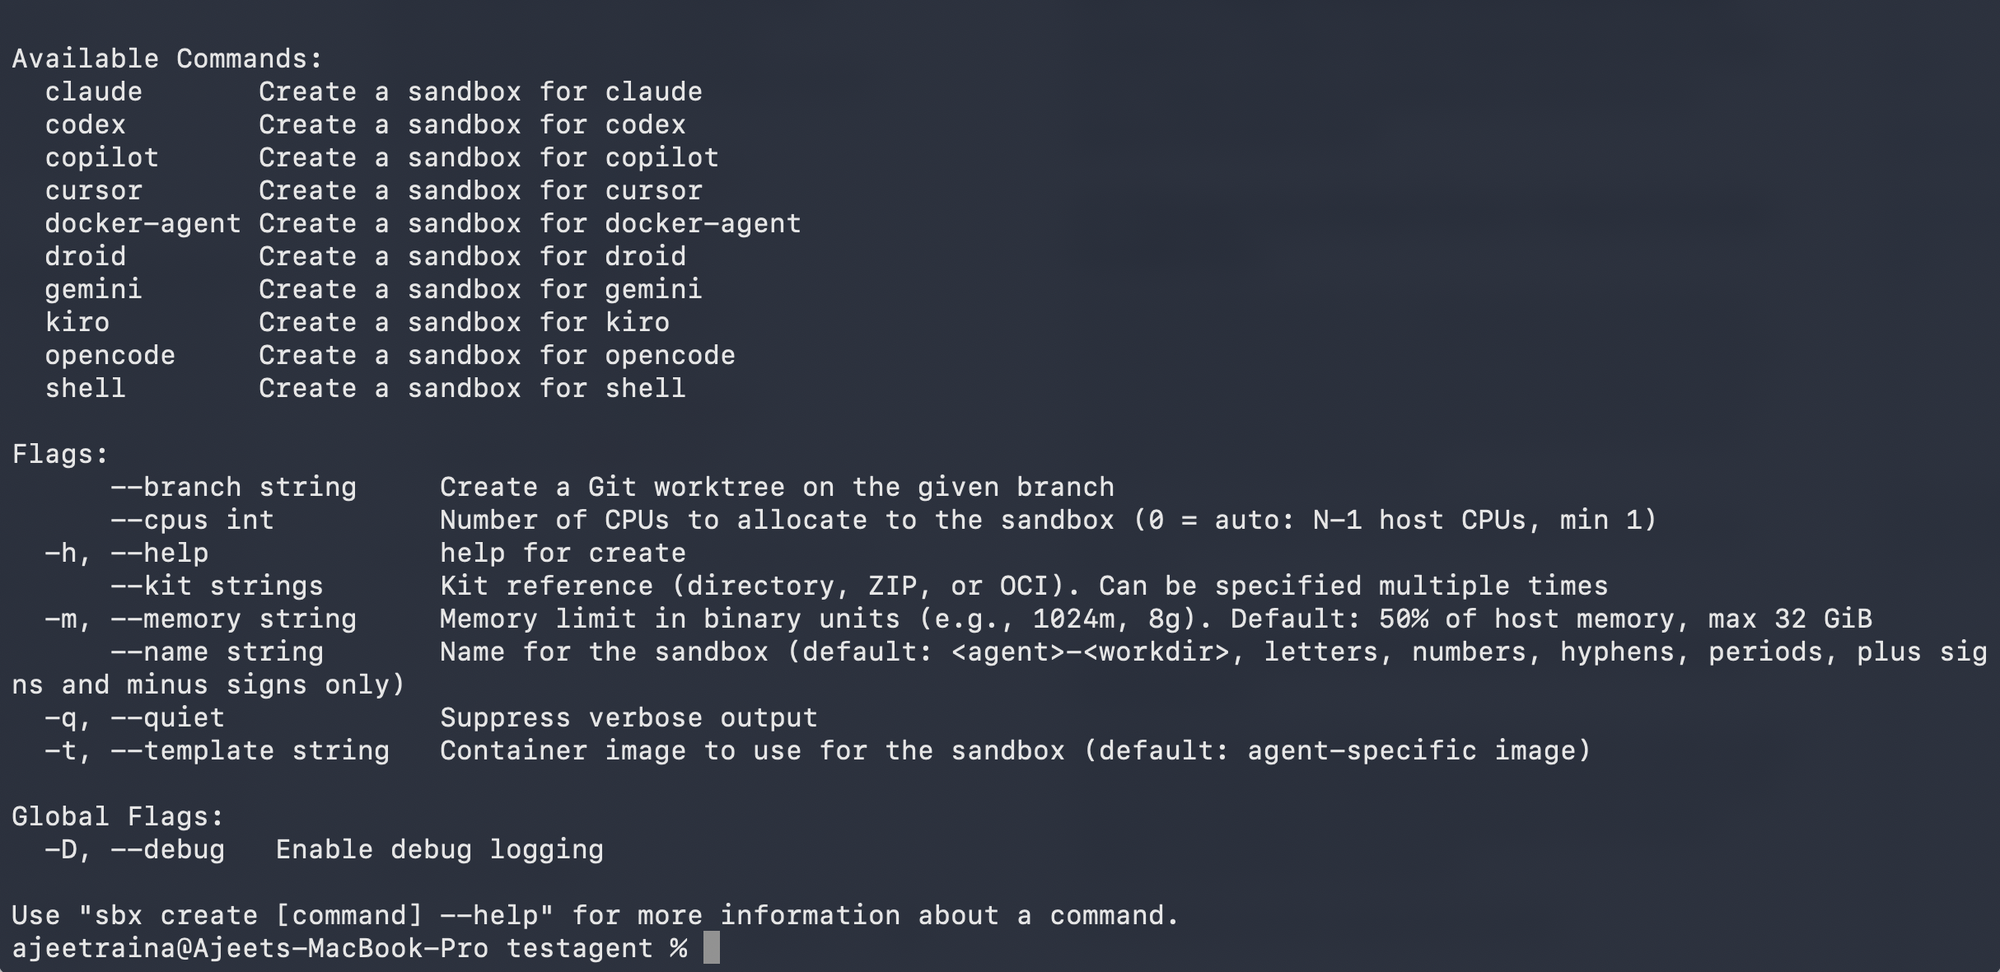
The flags live on sbx run and sbx create:
--cpus int        Number of CPUs to allocate (0 = auto: N-1 host CPUs, min 1)
-m, --memory      Memory limit in binary units (e.g., 1024m, 8g)
                  Default: 50% of host memory, max 32 GiB
Here's what I see on my own MacBook (M5 Max, 36 GB RAM), inspecting a freshly created Docker Agent sandbox through the dashboard:
Resources
  CPUs    17 (0%)
  Memory  0.3GB used / 17.8GB total
Disk 1.0GB used / 20.0GB total- 17 CPUs is N-1 for an 18-core machine.
- 17.8 GB is roughly 50% of 36 GB (the small gap is VM overhead).
Both numbers track the defaults exactly. On a 64 GB host the memory cap of 32 GiB would kick in instead.
If you're running multiple sandboxes at the same time, tune them down explicitly:
$ sbx run claude --cpus 4 --memory 8g
$ sbx run codex --cpus 4 --memory 8g
The dashboard (more on that in #10) shows live CPU and memory usage per sandbox, so you can see exactly what each one is using and adjust as you go.
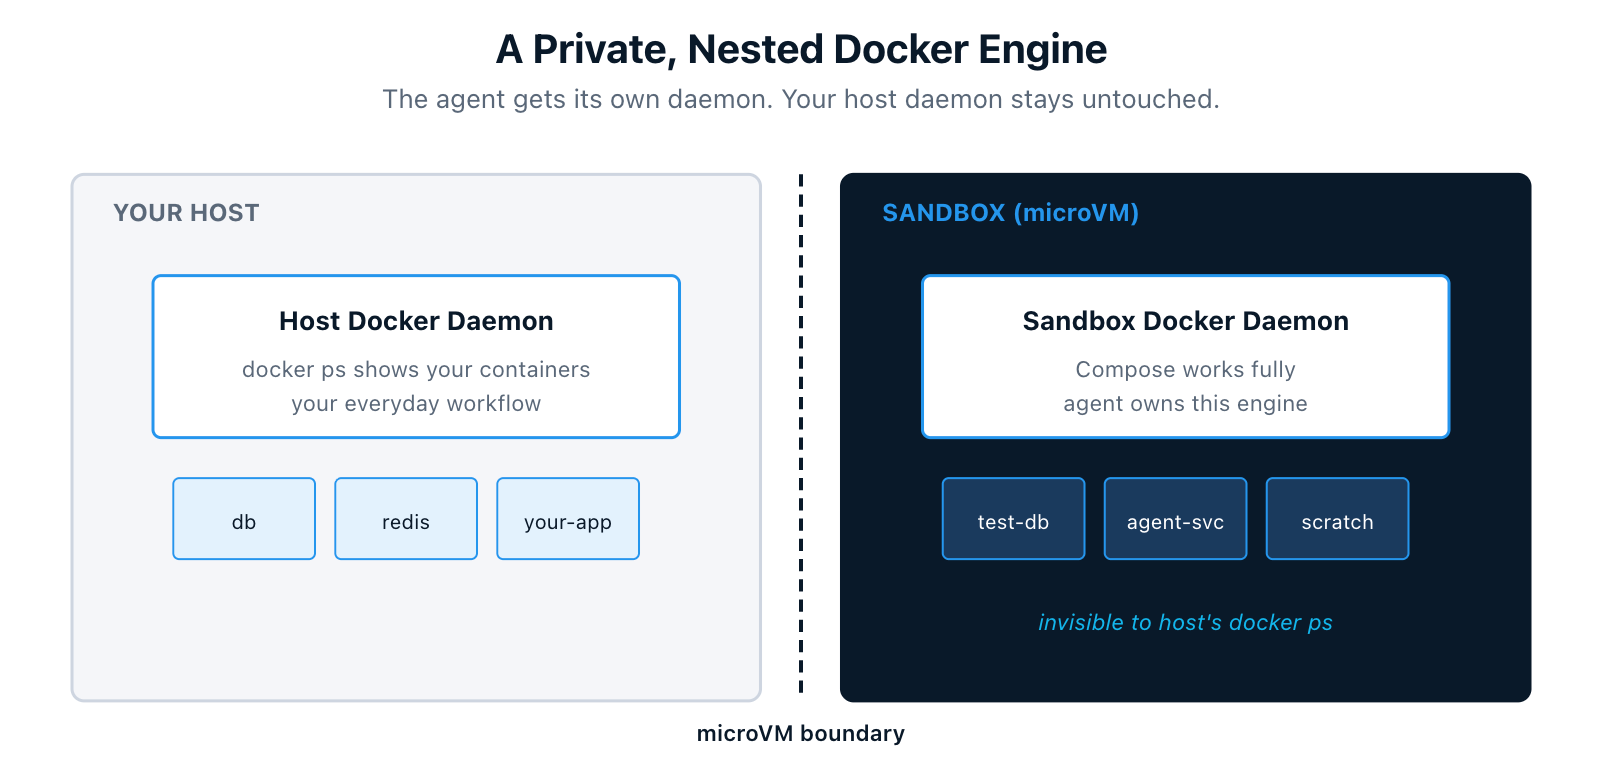
3. A Private, Nested Docker Engine
Inside the microVM, the agent gets its own Docker daemon. It can build images, run containers, and execute full Docker Compose workflows. None of it touches your host daemon. Containers the agent starts never show up in your host's docker ps.
When you remove the sandbox, everything inside, including images, containers, and volumes, is deleted with it. The host stays clean.
For an agent that needs to build a service, spin up dependencies, run integration tests, and then tear it all down, this is the difference between "I trust the agent to clean up after itself" and "I know the agent literally cannot leave anything behind on my machine."

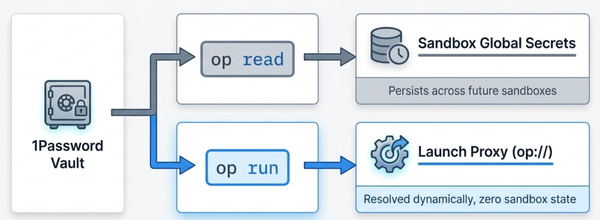
4. Credentials Never Enter the Sandbox
API keys, tokens, and other secrets stay on your host. They never get copied into the microVM. Instead, an HTTP/HTTPS proxy on your host intercepts every outbound request from the sandbox and injects the right authentication headers based on the destination.
So if the agent makes a call to api.openai.com, the proxy adds the Authorization header from your OPENAI_API_KEY on the way out. The VM only ever saw a request without credentials. If the sandbox is ever compromised, there is nothing of value sitting on its filesystem to exfiltrate.
The proxy also handles SSH agent forwarding, so the agent can sign Git commits using your local SSH key without the key itself ever being copied into the sandbox.
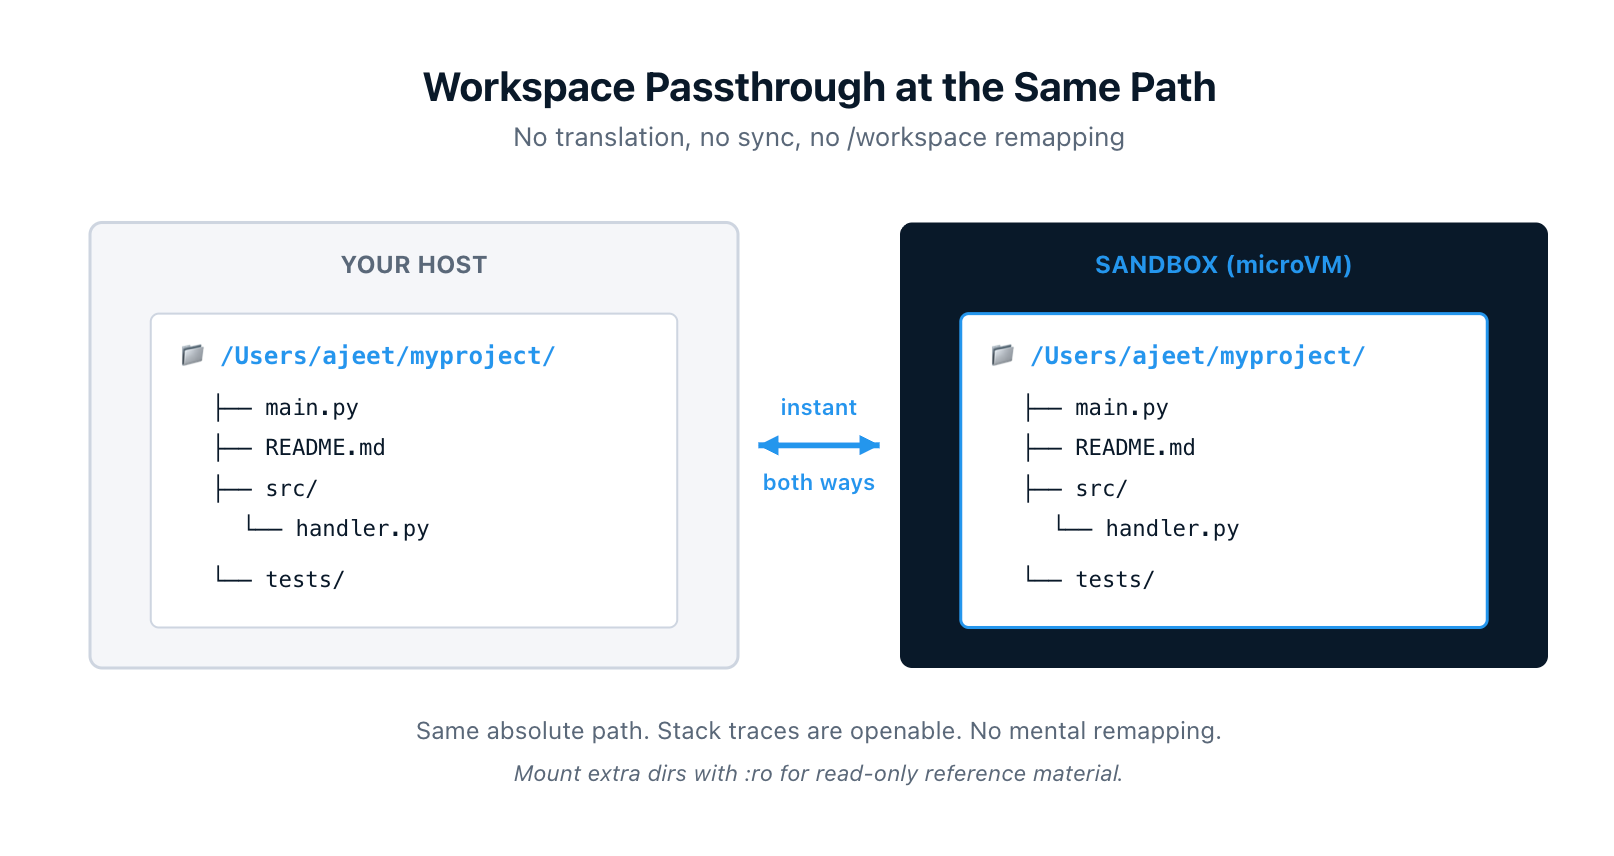
5. Your Workspace Is Mounted Directly, at the Same Path
Your workspace is mounted into the sandbox through a filesystem passthrough at the same absolute path as on your host. If your project lives at /Users/ajeet/myproject on macOS, the agent sees it at exactly /Users/ajeet/myproject. Not /workspace. Not /home/agent/project. The actual host path.
Two practical consequences:
- Changes flow both ways instantly, no sync process. The agent edits, your editor sees it. You save, the agent sees it.
- Error messages and stack traces reference paths that exist on your host. Open them in your editor directly. No mental remapping.
You can also mount multiple workspaces into the same sandbox, and append :ro to make any of them read-only. Useful for giving the agent reference material or shared libraries it shouldn't modify:
$ sbx run claude ~/project-a ~/shared-libs:ro ~/docs:ro
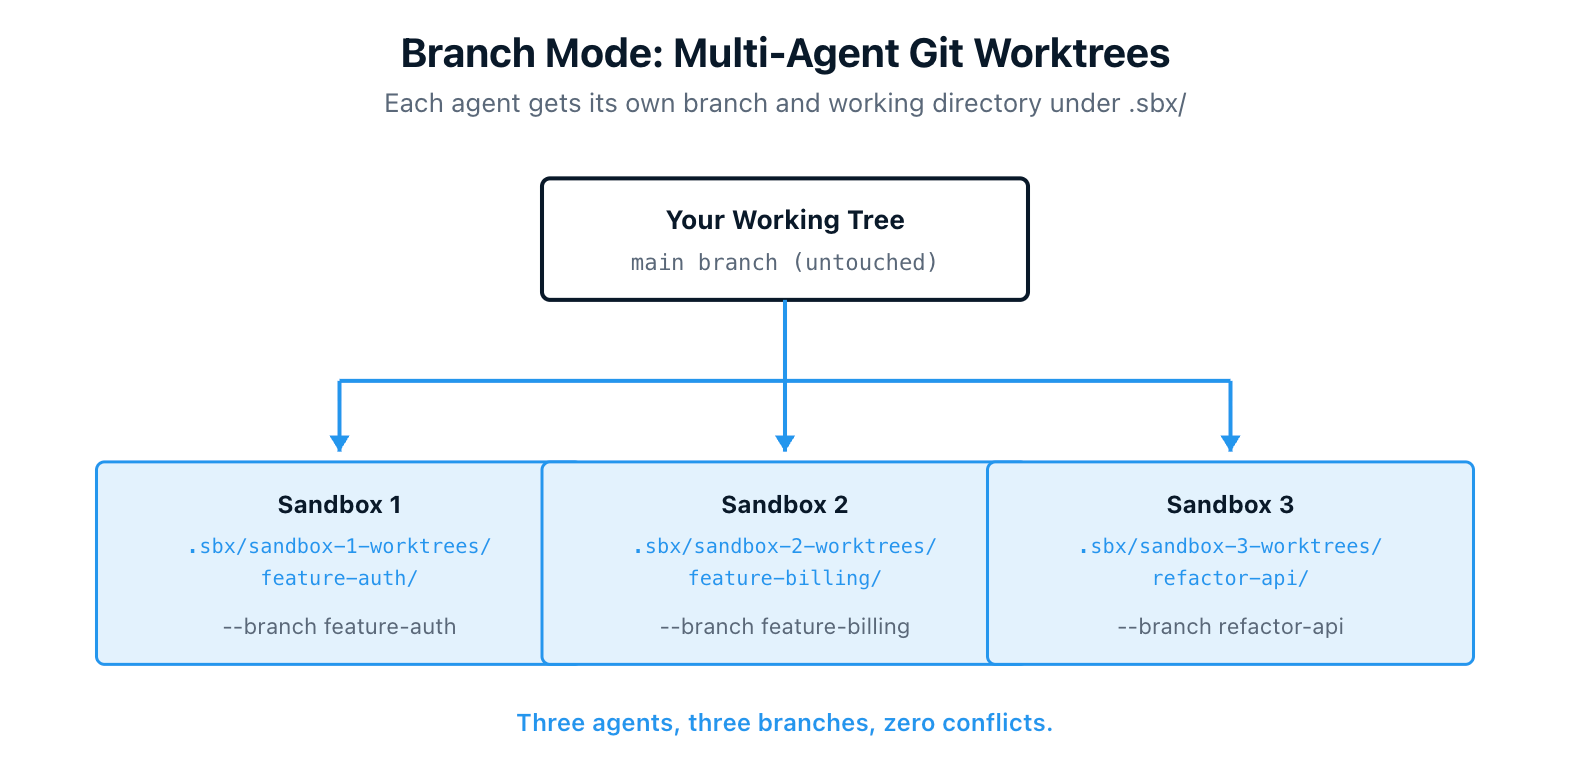
6. Branch Mode for Safe Multi-Agent Collaboration
By default, the agent edits your working tree directly. That works fine for solo use, but if you run multiple agents on the same repository at once, they will step on each other's changes.
Branch mode solves this. Pass --branch <name> and the CLI creates a Git worktree under .sbx/ in your repo, branches off your latest commit, and gives the agent its own isolated working directory. Your main working tree is untouched.
$ sbx run claude --branch my-feature
Or let the CLI generate a branch name automatically:
$ sbx run claude --branch auto
You can run multiple agents on different branches in the same sandbox, review each one's work separately with git worktree list, and push from inside the worktree when you're ready. Add .sbx/ to your .gitignore so it stays out of git status.
This pattern is what makes "two agents working on the same project at the same time" actually safe.
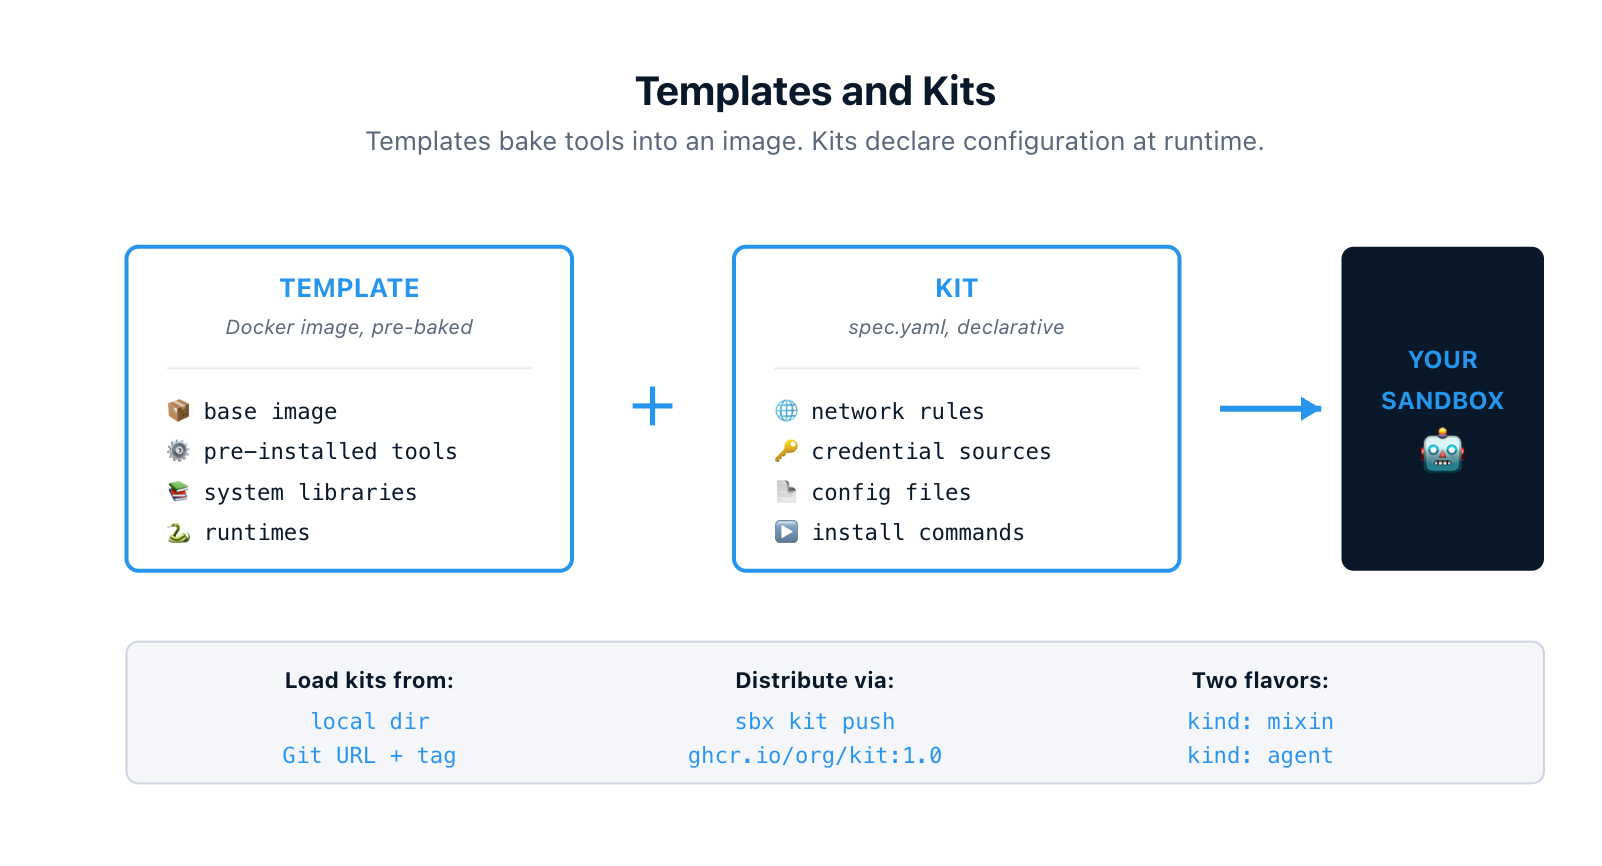
7. Customize With Templates and Kits
Two ways to extend sandboxes beyond the defaults:
Templates are reusable Docker images with tools and packages pre-baked in. You build them once with a Dockerfile (or save a configured running sandbox), and every sandbox started from that template inherits the setup.
Kits are declarative YAML files that extend a sandbox at runtime. One spec.yaml declares network rules, install commands, environment variables, credential sources, and files to inject. There are two flavors: mixin kits that extend an existing agent, and agent kits that define a brand new agent from scratch. The built-in claude agent is itself defined as a kit.
Kits load from a local directory, a Git URL with branch or tag pinning, or an OCI registry. Push them with sbx kit push ghcr.io/myorg/my-kit:1.0 and pull them on any other machine. Your team's standard linting setup, internal API allowlists, vendor auth headers, all version-controlled and shareable.
Templates handle the heavy lifting that should be baked into the image. Kits handle the per-run configuration that should be declarative. You can use them together.
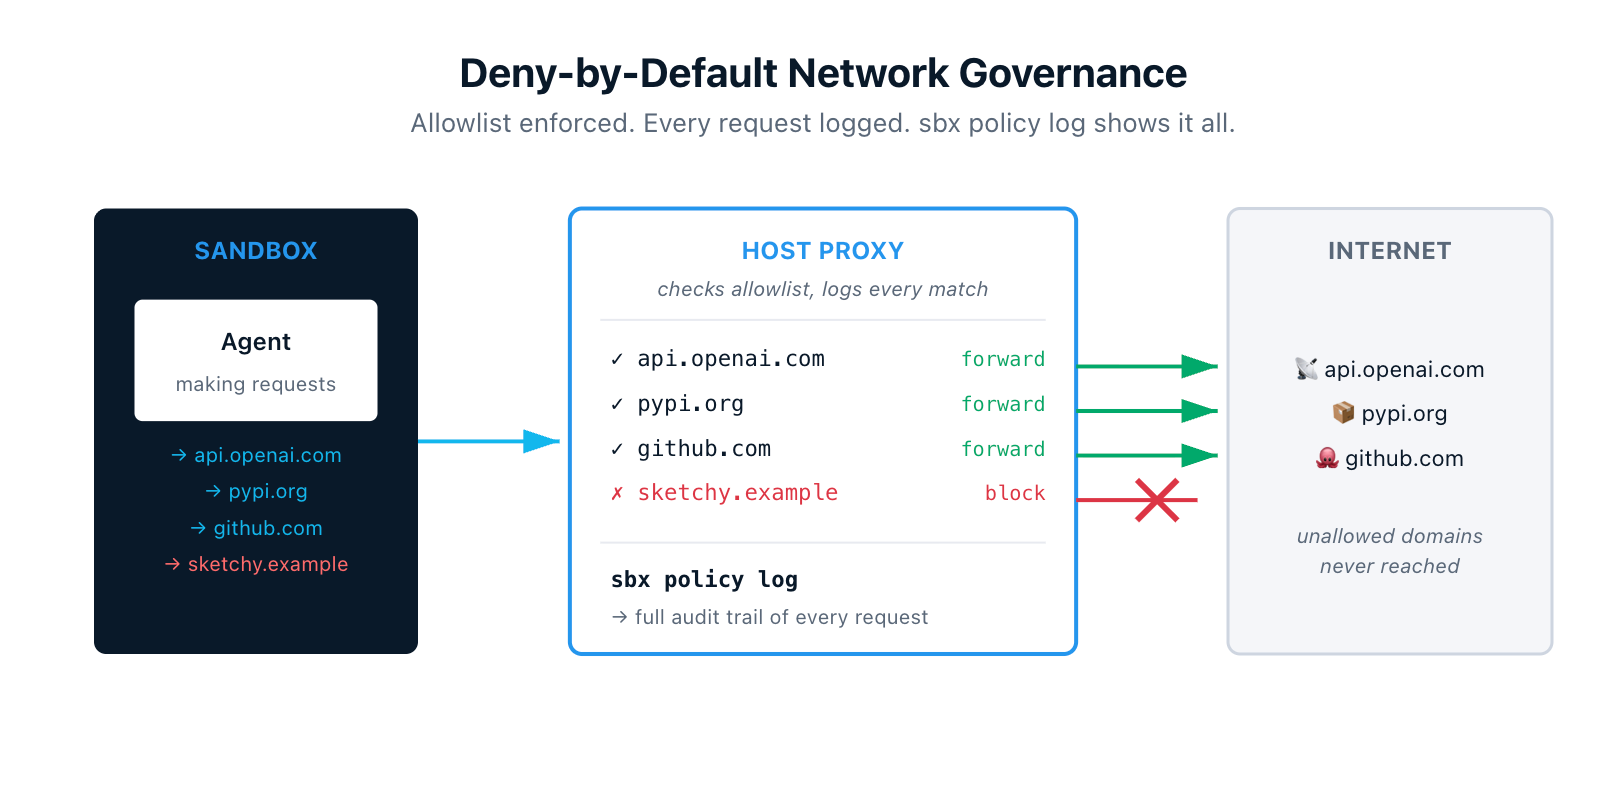
8. Deny-by-Default Network Governance With Live Auditing
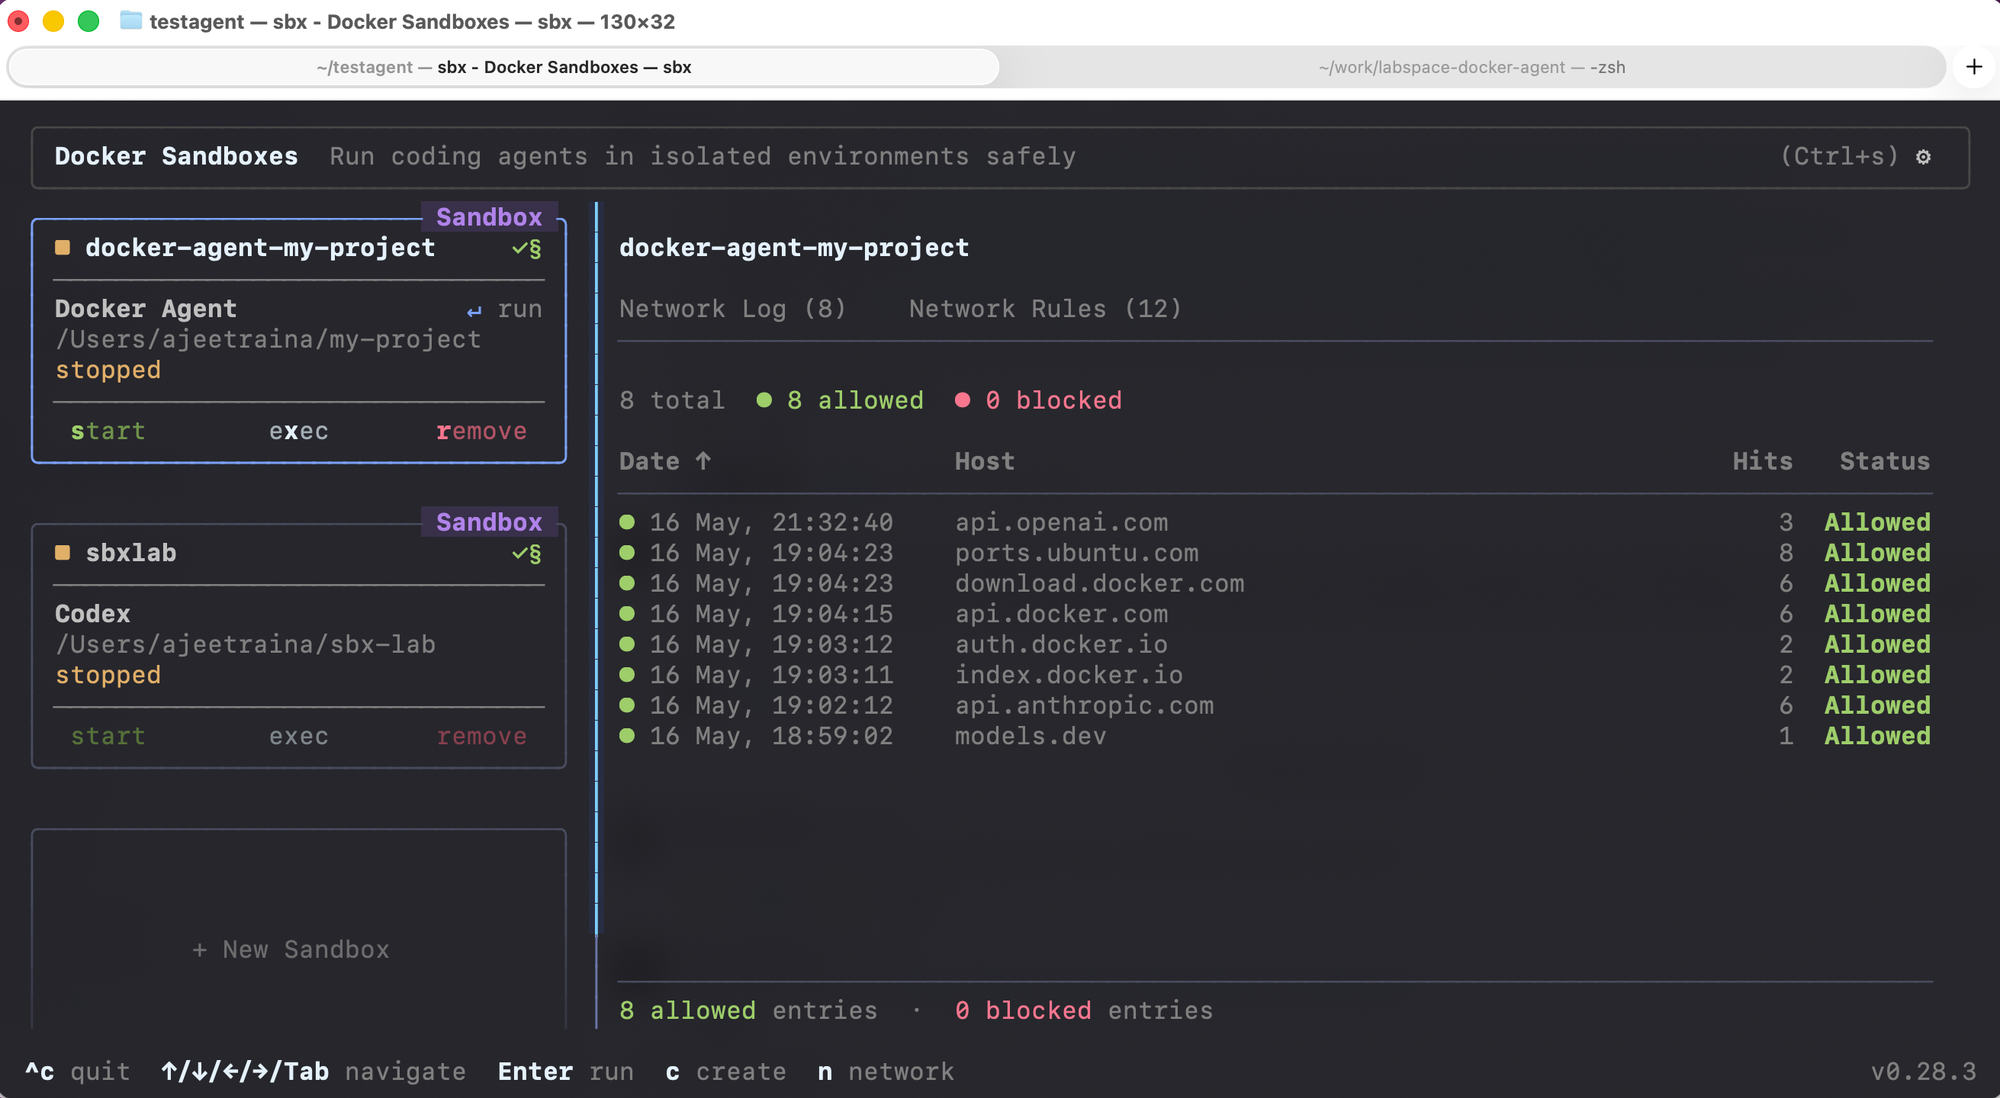
All outbound traffic from a sandbox routes through the host proxy. The proxy enforces network policies, and the default posture is restrictive. If a domain isn't on the allowlist, the request gets blocked. The agent literally cannot reach anywhere it wasn't explicitly authorized to reach.
The audit story is just as important. sbx policy log shows every outbound request the proxy saw, the rule that matched, and how it was forwarded — forward-bypass, forward, or block. After an agent run, you can see exactly which domains it reached, how often, and whether anything tried to escape.
For organizations, administrators can enforce network and filesystem policies sandbox-wide so individual users can't loosen the rules. Everyone in the org runs with the same allowlist.
For anyone who has been nervous about giving an agent broad permissions, this is the receipt that lets you trust it.
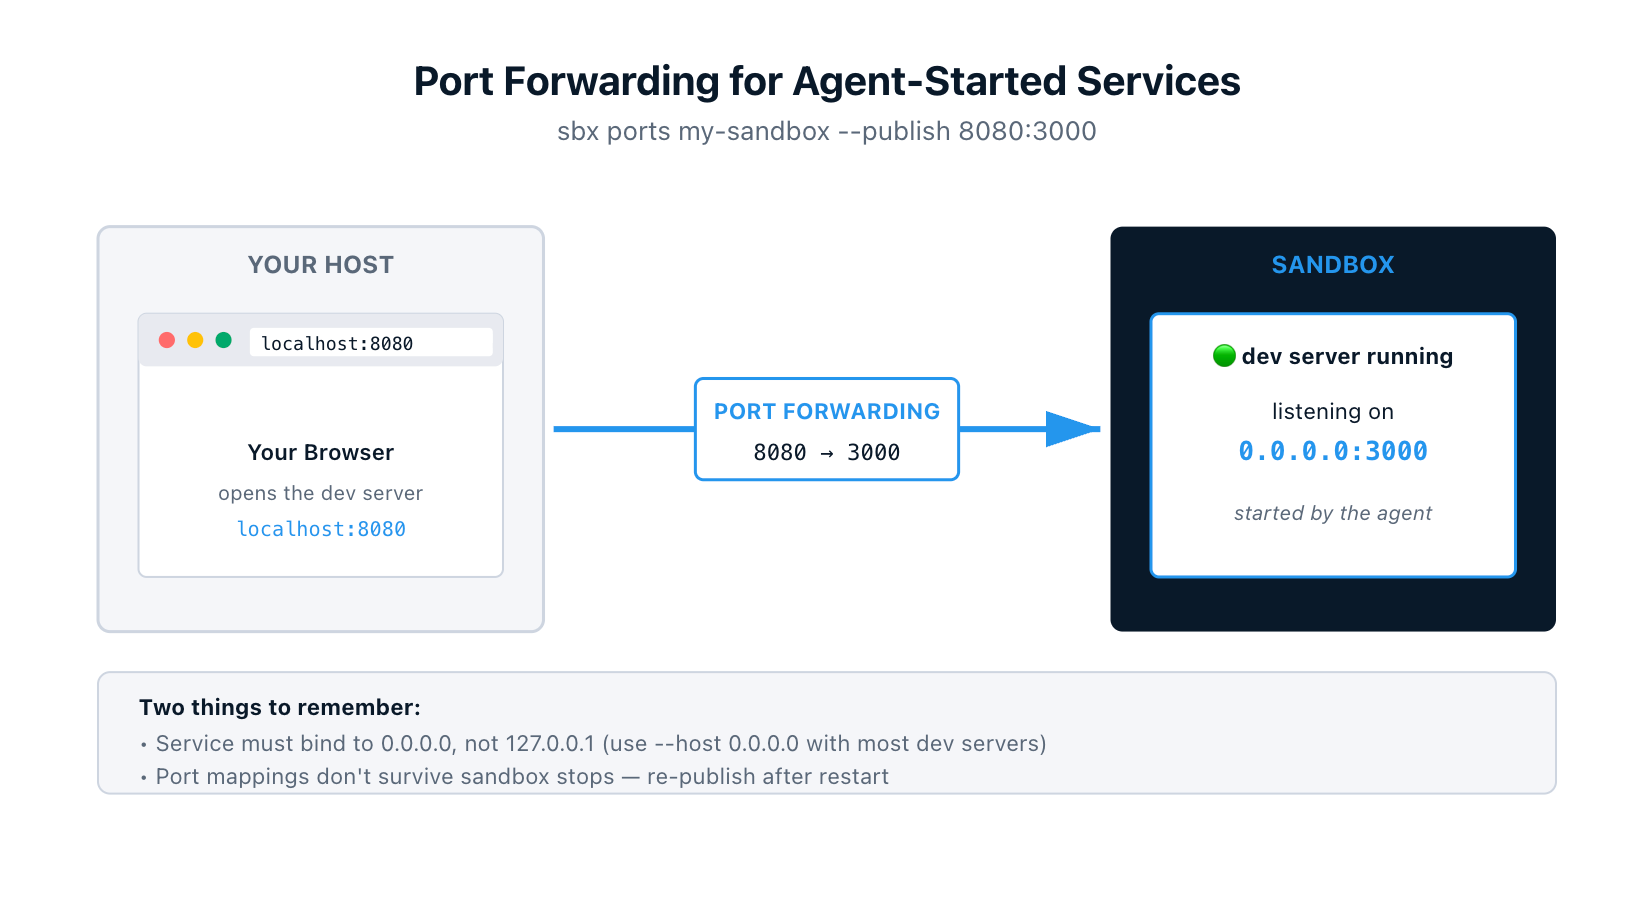
9. Port Forwarding for Agent-Started Services
Sandboxes are network-isolated, which means a dev server running inside one isn't reachable from your browser by default. sbx ports forwards traffic from a host port into the sandbox:
$ sbx ports my-sandbox --publish 8080:3000   # host 8080 → sandbox port 3000
$ open http://localhost:8080
Or let the OS pick a free host port:
$ sbx ports my-sandbox --publish 3000        # ephemeral host port
$ sbx ports my-sandbox                       # check what got assigned
Mappings show up in sbx ls alongside each sandbox.
Two gotchas worth remembering. First, the service inside the sandbox has to bind to 0.0.0.0, not 127.0.0.1. Most dev servers default to localhost, so you'll often need a --host 0.0.0.0 flag when starting them. Second, port mappings don't persist across sandbox stops — re-publish after restart.
10. Interactive Terminal Dashboard
Run sbx with no arguments and you get an interactive terminal dashboard. Every sandbox renders as a card with live status, CPU usage, and memory usage.
From the dashboard you can:
- Create a sandbox (
c) - Start or stop (
s) - Attach to the agent session (
Enter) - Open a shell inside the sandbox (
x) - Remove the sandbox (
r)
There's also a network governance panel where you can monitor outbound connections live, allow or block specific hosts, and add custom rules. Press Tab to switch panels, ? for the full keyboard shortcut list.
If you've spent any time running sbx ls in a loop to watch what an agent is doing, the dashboard is the upgrade.
Bonus: Persistence and Cleanup
Worth knowing alongside the rest: sandboxes persist until you explicitly remove them. Installed packages, Docker images, configuration changes, agent state, command history — all of it survives across stops and restarts. sbx run <sandbox-name> reconnects to your existing environment instead of creating a fresh one.
sbx rm <sandbox-name> deletes the sandbox, its VM, all of its contents, and any branch-mode worktrees and branches. Your workspace files stay on your host (they were a passthrough mount, never a copy). Your API keys stay too (they never left the host).
The mental model is: sandboxes are disposable, your work and your credentials are not.
Where to Go From Here
Quickest way in:
$ brew install docker/tap/sbx
$ sbx login
$ cd ~/my-project
$ sbx run claude
You'll get a Claude Code session running in a microVM against your project, with the proxy filtering and logging every outbound request. From there, try branch mode for multi-agent work, write a kit to standardize your team's setup, and use sbx ports when the agent spins up a service you want to poke at.
References
- Docker Sandboxes overview: https://docs.docker.com/ai/sandboxes/
- Usage guide: https://docs.docker.com/ai/sandboxes/usage/
- Architecture: https://docs.docker.com/ai/sandboxes/architecture/
- Customize with templates and kits: https://docs.docker.com/ai/sandboxes/customize/
- Kits reference: https://docs.docker.com/ai/sandboxes/customize/kits/
- Security model: https://docs.docker.com/ai/sandboxes/security/
sbx portsreference: https://docs.docker.com/reference/cli/sbx/ports/