SSH Straight Into Your Agent Sandboxes: A Hands-On Look at `sbx ssh`

sbx v0.37.0-rc1. The SSH feature is still experimental and the command surface has moved since the first nightly builds. The examples below were re-run end to end on my own machine against v0.37.0-rc1, and every command here is verified working. If you followed an earlier version of this post, note the two big changes: the setup command is now sbx setup ssh (not sbx ssh setup), and you connect with ssh <name>.sbx (a dot, not <name>@sbx).AI coding agents are brilliant right up until the moment they run rm -rf in the
wrong directory, curl a script from who-knows-where, or leak a token you forgot was in your environment. The whole promise of Docker Sandboxes (sbx) is to give those agents a room of their own Docker-native isolation for your filesystem, network, and tools so they can work in YOLO mode without putting your machine at risk.
The nightly builds add something I've wanted since day one: a proper SSH bridge into your sandboxes. No docker exec gymnastics, no fishing for container IDs. Just:
ssh sbxlab.sbx
Let's unpack what the sbx setup ssh command actually does, why it's designed the way it is, and how I tested it end to end.
First, what is sbx?
If you haven't met it yet: Docker Sandboxes creates isolated environments for AI agents, powered by the same containerization principles 20M+ developers already trust.
You point it at an agent and a workspace, and it spins up a locked-down box:
sbx create claude .        # a sandbox for Claude in the current directory
sbx run claude             # create AND drop into it in one step
Inside that box, the agent gets:
- YOLO mode by default, it works without stopping to ask permission
- A private Docker daemon for running test containers
- File access controls between host and sandbox
- Network access control via policies
- Compatibility with Claude Code, Codex, Gemini CLI, OpenCode, Cursor, and more
It's vendor-neutral and works with the models and tools you already use. But once an agent is happily churning away inside a sandbox, sooner or later you want in to poke around, debug something, copy a file, or just watch it work. That's where the SSH support comes in.
The mental model: sbx setup ssh is a setup command, not a connect command
Here's the single most important thing to understand, because it trips people up:
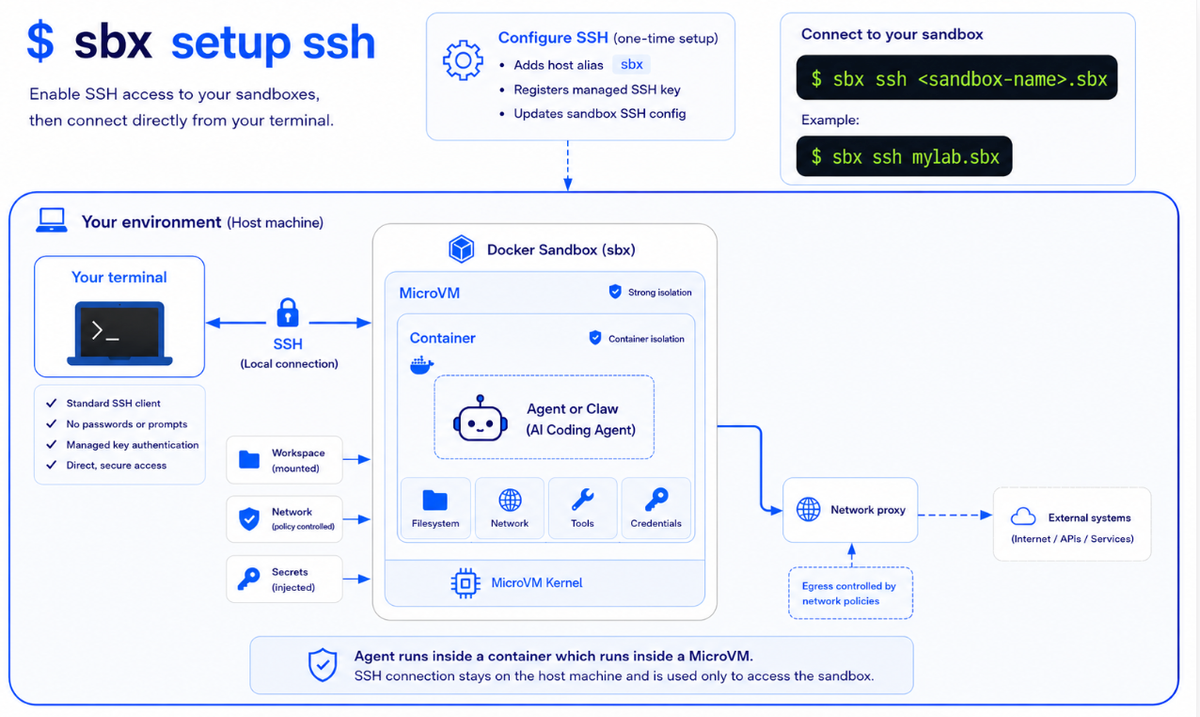
sbx setup ssh does not connect you to anything. It configures your normal SSH client so that plain old ssh can reach the sandbox daemon's SSH endpoint.
Run it once, and from then on you use the ssh client you already know. The design has three elegant properties:
- One wildcard host block. A single
Host *.sbxblock is added to your~/.ssh/config. There are no per-sandbox entries and no name prefixes to remember, every sandbox is reachable the moment it exists. - The sandbox name is the hostname. Want to reach the sandbox called
sbxlab? That'sssh sbxlab.sbx. The name before.sbxis the sandbox; the.sbxsuffix routes the connection through the sandbox daemon. - No SSH key to manage. There is no client key at all. Authentication is handled by the daemon's Unix socket (your OS user boundary) combined with an active Docker login. Nothing to generate, store, or rotate.
So the flow is: provision once, connect forever.
sbx login       ─────►   sign in to Docker (auth is login-gated)
                             │
sbx setup ssh   ─────►   writes ~/.ssh/config alias + known_hosts (idempotent)
                             │
ssh sbxlab.sbx  ─────────────┘   connects, no prompts
Setting it up
Make sure you're signed in first. SSH access is login-gated:
sbx login
Then the whole thing is a single command:
sbx setup ssh
Here's the actual output from my machine:
SSH ──────────────────────────────────────────────────────
Status       ● enabled · signed in as ajeetraina777
Access       *.sbx -> sandboxd.sock (no port · login-gated)

Connect ──────────────────────────────────────────────────────
Terminal     ssh <sandboxname>.sbx
File access  sftp <sandboxname>.sbx
Copy files   scp myfile.txt <sandboxname>.sbx:/path/to/workspace/

Reconfigure: sbx setup ssh (idempotent - safe to re-run any time)
Three things jump out of that output, and each one is a nice bit of design:
1. Login-gated, no client key
Notice Access *.sbx -> sandboxd.sock (no port · login-gated). There's no TCP port exposed and no private key to protect. The connection rides a local Unix socket (sandboxd.sock), so the OS user boundary is the security boundary, gated by your Docker login. That means nothing sensitive lands in ~/.ssh. The Host *.sbx block it writes explicitly sets IdentityFile /dev/null and IdentitiesOnly yes, so your personal keys are never even offered.
2. Live host-key verification (no annoying prompts)
Setup writes a managed known_hosts file (under Docker Sandboxes' own config dir) and points the Host *.sbx block at it via UserKnownHostsFile. Instead of you pinning a static host key, which breaks the moment the daemon rotates and greets you with that scary REMOTE HOST IDENTIFICATION HAS CHANGED wall of text, verification is handled for you. A rotated daemon key won't break your connections, and you never get a host-key confirmation prompt.
3. Clean config, no matter how many sandboxes
Because the alias is a wildcard (*.sbx) and the sandbox name is the hostname, your ~/.ssh/config stays exactly one block long whether you run one sandbox or fifty. Prefer a different pattern? sbx setup ssh --alias 'foo.sbx' writes a custom Host pattern instead of the default *.sbx.
Connecting
With setup done, connecting is just ssh. Here's the real session:
$ sbx ls
SANDBOX   AGENT    STATUS    PORTS   WORKSPACE
sbxlab    claude   stopped           /Users/ajeetraina/sbx-lab

$ ssh sbxlab.sbx
Connecting to sandbox "sbxlab"…
agent@sbxlab:~/workspace$
Look closely at what happened there:
- My sandbox
sbxlabwas stopped, and SSH transparently started it for me. - No password. No passphrase. No host-key prompt. Zero friction.
- I landed as
agent@sbxlabin~/workspace, i.e. inside the sandbox, not on my host.
That agent@sbxlab prompt is the proof that isolation is intact. I'm not on my Mac
anymore; I'm in the box.
You can also run one-off commands or copy files over the same endpoint:
ssh sbxlab.sbx -- echo hello       # run a single command and exit
scp ./data.csv sbxlab.sbx:/tmp/    # copy a file in
How I tested it (a repeatable recipe)
"It worked once" isn't a test. Here's the layered approach I'd recommend for anyone kicking the tires on sbx setup ssh: verify each layer before moving to the next.
0. Back up your SSH config first. Setup edits real files (~/.ssh/config and your known_hosts machinery), so give yourself an undo button:
cp ~/.ssh/config ~/.ssh/config.bak
1. Provision and inspect the side effects. Don't just trust the status panel look at what changed:
sbx setup ssh
grep -A8 "Host \*.sbx" ~/.ssh/config
ls -l ~/Library/Application\ Support/com.docker.sandboxes/sandboxes/ssh/
You want to see a clean Host *.sbx block (with ProxyCommand … sbx ssh proxy %n) and a managed known_hosts file.
2. Smoke test: the connection must be prompt-free. This is the core promise:
sbx create shell .          # or reuse a sandbox from `sbx ls`
ssh <name>.sbx -- echo hello
If that prints hello with no passphrase and no host-key question, the socket auth and managed known_hosts are wired up correctly.
3. Interactive shell. Confirm a stopped sandbox auto-starts and you land inside it:
ssh <name>.sbx
# expect: agent@<name>:~/workspace$
4. Isolation and negative checks: the part people skip. A happy-path demo isn't a real test. Prove you're actually sandboxed, and that bad input fails cleanly:
ssh <name>.sbx -- 'whoami; hostname'   # should be the sandbox, not your host
ssh doesnotexist.sbx -- echo hi        # a bogus name should fail gracefully
The bogus name returns a clear message rather than a cryptic SSH error:sandbox "doesnotexist" does not exist and auto-create is off.
5. Idempotency. Re-running setup should be a no-op, no duplicate blocks:
sbx setup ssh # run again; ~/.ssh/config stays a single *.sbx block
Run through those and you've genuinely exercised the feature: provisioning,
authentication, auto-start, and isolation, not just the demo.
Where SSH fits in the bigger sbx picture
SSH is one door into the sandbox; here's the rest of the house, so you know which tool to reach for:
| I want to… | Command |
|---|---|
| Make a sandbox | sbx create <agent> <path> |
| Make one and attach | sbx run <agent> |
| Run a command inside | sbx exec -it <name> bash |
| Configure SSH access | sbx setup ssh → ssh <name>.sbx |
| Copy files in/out | sbx cp ./f <name>:/tmp/ |
| Expose a host path | sbx mount <name> /path:/workspace/data:ro |
| Publish a port | sbx ports <name> --publish 8080 |
| Control network egress | sbx policy allow/deny … |
| Store credentials | sbx secret set <service> |
| List / stop / remove | sbx ls · sbx stop <name> · sbx rm <name> |
A handy mental model:
- create makes it · run makes + attaches · exec runs inside · setup ssh enables
ssh <name>.sbx - stop keeps state · rm deletes · reset wipes everything
- Isolation knobs: mount (files) · ports (network in) · policy (network out) · secret (credentials)
Why this matters
On the surface sbx setup ssh is a convenience: one command, one wildcard alias, you're in. But the details are where the thoughtfulness shows:
- Login-gated socket auth means sandbox access is tied to your Docker login and the OS user boundary, there's no long-lived SSH key sitting on disk to leak or revoke.
- Live host-key verification kills the single most common source of SSH friction: the "identification has changed" wall after a key rotation.
- The name-is-the-hostname trick with a single
*.sbxwildcard means your~/.ssh/configstays clean no matter how many sandboxes you spin up.
Add it all up and you get the thing SSH always should have been for ephemeral
environments: secure by default, and completely out of your way.
Try it yourself
# macOS
brew install docker/tap/sbx@nightly

# then
sbx login
sbx setup ssh
sbx run shell .
ssh <name>.sbx
The SSH command is experimental today, so keep an eye on the release notes as it
stabilizes, flags and output are still evolving (this post tracks v0.37.0-rc1).
If you hit something weird, sbx diagnose will collect what you need to file a good bug report.
Give your agents a room of their own and now, a clean SSH path into it. 🔐