Getting Started with the Pi Agent Kit on Docker Sandboxes
Run the Pi coding agent in an isolated microVM in about ten minutes, with your API key kept on the host and out of the agent's reach. A step-by-step walk through the official Pi kit for Docker Sandboxes.

This is a hands-on walkthrough. By the end you will have the Pi coding agent running inside an isolated microVM, working on a real project, with your Anthropic API key never once entering the sandbox. It takes about ten minutes, and most of that is the first install.
Two quick definitions before we start. Pi is a minimal terminal coding agent with a TUI, extensible tools, and skills. A kit is the way you extend Docker Sandboxes: a small declarative YAML artifact that tells sbx how to set up and launch an agent. The official Pi kit lives in Docker's sbx-kits-contrib repo, and the nice thing is you never have to clone or build anything. You point sbx at the kit's git URL and it does the rest.
What you will need
A Docker account, an Anthropic API key, and the sbx CLI installed. That is the whole list.
Step 1: Install the sbx CLI
Docker Sandboxes used to ship inside Docker Desktop, but it now installs as a standalone sbx tool that does not need Desktop at all.
On macOS and Windows, grab the installer from the get started guide and run it.
On Debian or Ubuntu Linux, install it from the Docker apt repo:
curl -fsSL https://get.docker.com | sudo REPO_ONLY=1 sh
sudo apt-get install docker-sbx
sudo usermod -aG kvm $USER
newgrp kvm
The kvm group steps matter on Linux, because the microVM needs hardware virtualization access. Confirm the CLI is there:
sbx --version
Step 2: Log in and choose a network policy
sbx login
This opens a browser for Docker OAuth. On your first login, sbx asks you to pick a default network policy for your sandboxes. You get three choices: Open allows all traffic, Balanced denies by default but permits common development sites, and Locked Down blocks everything until you allow it.
Pick Balanced to start. It is the sensible middle ground, and you can adjust individual rules later. This choice is the foundation of the whole isolation story, so it is worth understanding rather than clicking past.
Step 3: Give sbx your Anthropic key, without putting it in the box
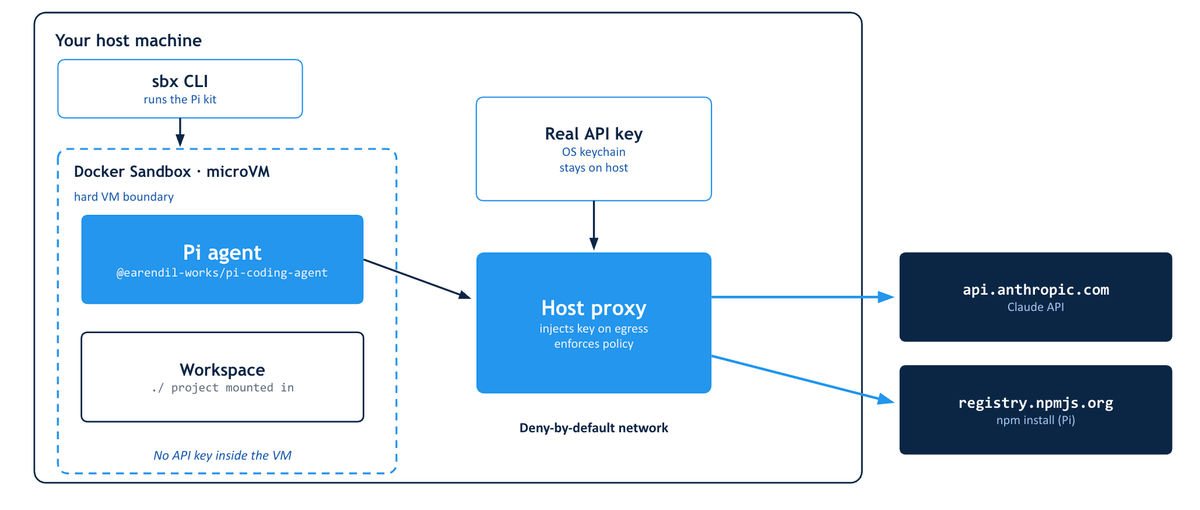
The Pi kit talks to Anthropic, so sbx needs your API key. The important idea is that the key stays on your host. Inside the sandbox it is only ever a proxy-managed placeholder, and a proxy on your host swaps in the real value on outbound requests to Anthropic. The agent makes authenticated calls but can never read or leak the key.
You have two ways to provide it. The quick way is to export it in the shell you will run sbx from:
export ANTHROPIC_API_KEY=sk-ant-api03-xxxxx
The proxy reads the variable straight from your terminal session. The more secure way, and the one Docker recommends, is to store it in your OS keychain instead, where it is encrypted at rest:
sbx secret set -g anthropic
That prompts for the value and stores it globally for all your sandboxes. One catch worth knowing up front: global secrets are injected when a sandbox is created, so set them before you launch, not after. If both a stored secret and an environment variable exist for the same service, the stored secret wins.
If you also want Pi to push branches or open pull requests later, give it a GitHub token the same way, ideally a read-only one to keep the risk low:
echo "$(gh auth token)" | sbx secret set -g github
Step 4: Launch the Pi kit
Now the payoff. From inside the project directory you want to work on, run:
sbx run --kit "git+https://github.com/docker/sbx-kits-contrib.git#dir=pi" pi
The #dir=pi fragment tells sbx which subdirectory of the contrib repo holds the kit, and the trailing pi is the agent to launch. The first run takes a little longer because sbx pulls the shell base image and runs npm install -g @earendil-works/pi-coding-agent inside the sandbox. The kit retries that install a few times on purpose, since installs inside a locked-down network are flakier than on your open laptop. Once it finishes, you land in Pi's TUI, running in the microVM, with your current directory mounted as its workspace.
Subsequent launches reuse the same sandbox and start in seconds.
For anything you intend to repeat or share, pin the kit to a tag or commit instead of tracking the default branch, so the environment is reproducible:
sbx run --kit "git+https://github.com/docker/sbx-kits-contrib.git#ref=v0.2.0&dir=pi" pi
Step 5: Put Pi to work
Give Pi a task in the TUI, something like asking it to summarize the repository or add a test for a specific function. It edits your working tree directly, so changes land in the files you mounted.
If you want to give Pi standing instructions for a project, drop an AGENTS.md file in the directory. The kit is configured to read its agent instructions from that filename, so it is the natural place to describe your conventions, build commands, and house rules.
Verify the isolation for yourself
This is the part I always recommend doing once, because it turns the security claim from words into something you have seen. Inside the running sandbox, print the key the agent can see:
echo $ANTHROPIC_API_KEY
You will get proxy-managed, not your real secret. And yet Pi is making authenticated calls to Anthropic perfectly well, because the real key is injected by the host proxy on the way out and never crosses into the VM.
From your host, you can watch exactly what the sandbox is allowed to reach:
sbx policy log
You will see the npm registry during install and api.anthropic.com while Pi works, and very little else. The entire outbound surface of this agent is two named destinations you can reason about, which is the point of running it deny-by-default.
Managing the sandbox
A few commands cover day-to-day use. Running sbx with no arguments opens an interactive dashboard where you can see status, attach to agents, open shells, and manage network rules. To re-enter an existing sandbox, use its name (the --kit flag is for creation only, so reattaching does not take it):
sbx run <sandbox-name>
To run a one-off command inside an existing sandbox without attaching, use sbx exec <sandbox-name> -- <command>. When you are done and want it gone, sbx rm <sandbox-name> deletes the sandbox, its VM, and everything installed inside it. Your actual project files in the working tree are untouched.
Troubleshooting
If an install or download fails, it is almost always a blocked domain. The Pi kit only opens the npm registry and Anthropic, so anything else you add will be denied by default. Allow the domains you need and check the log to see what got stopped:
sbx policy allow network "example.com,cdn.example.com"
sbx policy log
If Pi cannot authenticate, make sure the key was set on the host before the sandbox was created, since global secrets are injected at creation time and cannot be added to a running sandbox. And on Linux, if the VM refuses to start, revisit the kvm group steps from Step 1.
Where to go next
Open the kit's spec.yaml and trace the credentials, environment, and network blocks. Under fifty lines describe the whole credential proxy you just used, and seeing it written out makes the mechanism click. If you want to wrap a different agent, Docker has a build your own agent kit tutorial that walks the same spec field by field.
Kits are still experimental and the format may shift, so pin your refs for anything that matters. But as a first real taste of running an autonomous coding agent in a hard isolation boundary, the Pi kit is about as low-friction as it gets.